
Want to create a hanging indent or get rid of one that’s driving you crazy? You’re in the right place.
In a hanging indent, the second and subsequent lines of a paragraph are indented more than the first line.
The fastest way to remove a hanging indent is to select the paragraph, click Home > 
Add a hanging indent
-
Highlight all the text (other than the first line of the paragraph) you want to indent.
-
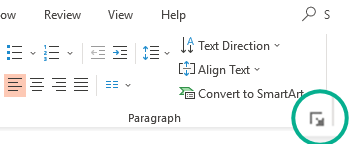
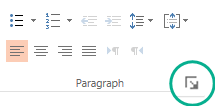
Click the Home tab, and then click the Paragraph dialog box launcher.
-
Under Indentation, in the Before text box, click the arrow to approximately .5".
Note: One-half inch is the typical measurement for indenting a hanging paragraph.
-
Click the arrow next to Special, and choose Hanging.
-
Click the Home tab, and then click the Paragraph dialog box launcher.
-
Under Indentation, click the arrow next to Special, and choose None.
To add a hanging indent to an unnumbered list (short lines of text separated by line breaks, rather than a paragraph that flows from line to line), you follow steps similar to adding a hanging indent.
-
Highlight all the short lines of text (other than the first line of the paragraph) you want to indent.
-
Click the Home tab, and then click the Paragraph dialog box launcher.
-
Under Indentation, in the Before text box, click the arrow to approximately .5".
Note: One-half inch is the typical measurement for indenting a hanging paragraph.
-
Click the arrow next to Special, and choose First line.
Add a hanging indent
-
Select the paragraph or paragraphs you want to indent.
-
Click the Home tab, and then click the Paragraph dialog box launcher.
-
Under Indentation, in the Before text box, click the arrow to approximately .5".
Note: One-half inch is the typical measurement for indenting a hanging paragraph.
-
Click the arrow next to Special, and choose Hanging.
-
Click the Home tab, and then click the Paragraph dialog box launcher.
-
Under Indentation, click the arrow next to Special, and choose (none).
To add a hanging indent to an unnumbered list (short lines of text separated by line breaks, rather than a paragraph that flows from line to line), you follow steps similar to adding a hanging indent.
-
Highlight all the short lines of text (other than the first line of the paragraph) you want to indent
-
Click the Home tab, and then click the Paragraph dialog box launcher.
-
Under Indentation, in the Before text box, click the arrow to approximately .5".
Note: One-half inch is the typical measurement for indenting a hanging paragraph.
-
Click the arrow next to Special, and choose First line.


