
Notes:
-
Delve blogs are being retired.
-
For an alternative way to create blogs in SharePoint, see Creating a blog with communications sites and news posts.
-
Beginning January 18th, 2020, tenants will not have the ability to create new Delve blogs.
-
Beginning February 18th, 2020, the ability to create new or edit posts in existing Delve blogs will be disabled.
-
Beginning July 17th, 2020, existing Delve blogs will be deleted and removed from Delve profiles.
If enabled by your Microsoft 365 tenant administrator, you can create a personal blog to quickly share ideas and information with others in your company. Everyone in your company can view your personal blog by default, but people outside the company can't.
The personal blog feature is now integrated with Delve, making it easier for you to access your blog posts, profile information, and a list of recent documents you’ve worked on all from a single location.
Personal blogs use the new Microsoft 365 authoring canvas. The authoring canvas provides a consistent content creation and editing experience across parts of Microsoft 365, making it easier for you to create and publish content within your organization. For example, as you create or edit a blog post, your changes are saved for you.
Create a personal blog
-
To create a personal blog, go to your profile by doing one of the following:
-
Click your profile picture in the Microsoft 365 header, and then select About me.
-
In Delve, select Me from the left-hand menu and then select the Profile link.
-
-
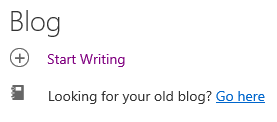
Scroll to the Blog section on your profile and click Start Writing.
Create a blog post
-
You can create a new blog post by clicking either Start Writing under the Blog section of your profile page or, if you already have posts on your blog, by clicking All Posts and then clicking the New Post tile.
-
On the blog post page, click Add Image to add a header graphic for your blog post.
-
Click Title to add a title for your blog post and click Subtitle to add a subtitle if needed.
-
To add text to your blog post, click Start writing your story and enter the text for your blog post.
-
You can add an image, text area, video, or other asset to your blog post by hovering your pointer just above or below the text box, clicking the "+" sign that appears, and choosing the asset you want to add. When you add a document this way, the document appears as a thumbnail that is linked to the document. Clicking on the document opens it in Microsoft 365 for the web. You can also convert the asset to embedded view by clicking the expand arrows


-
To embed a Microsoft Office document in your blog post, select the document from the list of suggested documents or click Add Office Document to embed a document not in the list. Once you publish your post, readers can view the document in line with the rest of your blog post, download a copy of the document, create a PDF version, or open the document in Microsoft 365 for the web. You can convert the view to a thumbnail by clicking the contract arrows

-
To delete a section from your page, hover your mouse over the section you want to delete and click the trash can

-
When you're ready to publish your blog post, click Publish in the top right corner of the page. If you want to save your blog post and wait to publish it later, simply navigate away from the page. Your changes are automatically saved. To see if your changes have been saved, check the top left corner of the page.
Edit a blog post
-
To edit a blog post, click All Stories under the Blog section of your profile page, select the blog post you want to edit, and then click Edit in the top right corner of the page.
-
Select the content you wish to edit and make your changes.
-
When finished editing your blog post, click Publish in the top right corner of the page to publish your changes. If you want to save your changes and wait to publish them later, simply navigate away from the page. Your changes are saved automatically.
Note: To get back to your list of blog posts, click your name in the top left corner of the page.
Delete a blog post
-
To delete a blog post, click All Stories under the Blog section of your profile page, select the blog post you want to delete, and then click the trash can
Is a blog automatically deleted when the author leaves a company?
No, Delve blogs are hosted on a separate site and are not deleted when an employee or author leaves a company or organization. If an ex-employee or past author's blog needs to be deleted, it can be removed by a Global or SharePoint administrator.
Delve blogs are not subject to the same retention process as a OneDrive for work or school site. The blog will continue to exist after the author leaves the company or organization, until it is deleted by an administrator.


