
If you want to make changes to a file in a SharePoint document library, but keep others from making changes at the same time, check the file out of the document library.
When you check out a file from a SharePoint document library, only you can edit it. You can edit the file either online in Microsoft 365 or offline and save your changes as often as you like before checking the file back in. Once you're done making changes to the file, check it in from the library to upload your changes. You can discard your changes and undo the check-out if you change your mind.
Note: If you don't see the user interface shown in these examples, you may be using an earlier server version of SharePoint. See Check out, check in, or discard changes to files in a library instead.
Note: When you check out a file, nothing happens to it. The file is still stored in the library. It's just marked to show that you have exclusive editing rights until you check it back in. To edit it, you must download the document or edit it online. How you edit or update the file depends on the type of file. If it's a Word document, you can use Word in Microsoft 365 or your desktop copy of Word. For a file that isn't an Microsoft 365 format, download the file and use whatever editor you normally use for that format.
Check out a file from a document library
You can check out one or more files at a time.
-
Open the library with the file you want to check out, select the file, click the ellipses (...) in the tool bar, and then click Check out.
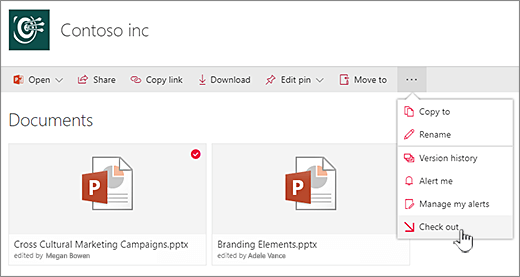
You can also right-click the file, click either Advanced or More, and then click Check Out.
-
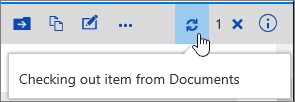
A note is displayed while the file is being checked out. If you click on the icon, you can see the progress of the checkout.
-
When a file is checked out, the document's icon will have a green arrow over it.

Check in a file to a document library
-
Open the library, and select the file you want to check in. Click the ellipsis (...) in the toolbar and then click Check In.
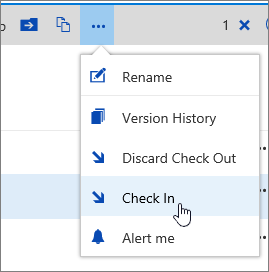
Note: You can also right click the file, click Advanced or More, and then click Check In.
-
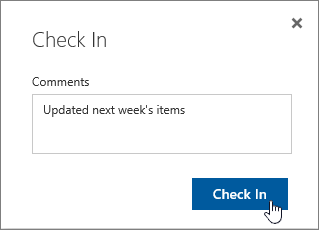
In the Check In dialog box, you can enter a comment, such as what you changed or added.
-
Click Check In when you're done.
If you try to check in a document that you haven't made changes on, you'll get a message that says an item or items weren't updated.
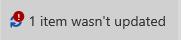
Check to be sure you saved changes on the document before checking in. Since SharePoint in Microsoft 365 leaves the document checked out and nobody else can edit it, discard the check out if you don't want changes made.
Notes:
-
To check multiple files in or out and check in someone else's files, you'll need to click Return to classic SharePoint and follow the steps in Check out, check in, or discard changes to files in a library.
-
To exit classic SharePoint, close all your browser windows, and then log back in to Microsoft 365.
Discard a check-out from a document library
-
Open the library, and select the file that you want to discard the check out.
-
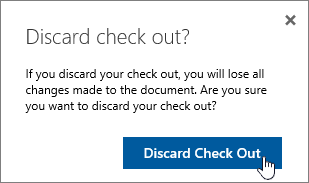
Click the ellipsis (...) in the toolbar and then click Discard Check Out.

Note: You can also right click the file, click Advanced or More, and then click Discard Check Out.
-
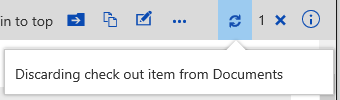
You'll get an "are you sure" dialog when you discard a check out. Click Discard Check Out to clear the check out.
To be sure your file's check out status, you can click on the icon above the Discard Check Out message.
Notes:
-
To check multiple files in or out and check in someone else's files, you'll need to click Return to classic SharePoint and follow the steps in Check out, check in, or discard changes to files in a library.
-
To exit classic SharePoint, close all your browser windows, and then log back in to Microsoft 365.
A quick way to see who has a file checked out is to hover over the Checked Out icon 
You can also show the Checked Out By column in the default view of the library. This way, everyone can easily see who has a document checked out. You can choose which columns to show and hide when you create a custom view of a document library.
You can replace an existing document with a new one by following these steps.
-
In the document library, check out the file you want to replace.
-
Name the new file with the exact same name as the one you want to replace, and either drag it onto the library, or use the Upload button. Another option is to download the file, and overwrite it. For more info on uploading, see Upload files and folders to a document library.
-
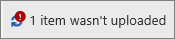
In SharePoint in Microsoft 365 you will see a progress message that says the item wasn't uploaded on the tool bar, click the message.
-
In the Progress dialog, click Replace.

-
Check the file back in to replace the old file with the new file. If you change your mind, follow the discard a check out steps above.
If you have versioning enabled, when the file is checked in, SharePoint makes a new copy, keeping earlier versions. For more info on versioning, see How does versioning work in a list or library?.
Leave us a comment
Updated January 31, 2023.
Was this article helpful? If so, please let us know at the bottom of this page. If it wasn't helpful, let us know what was confusing or missing. Please include your version of SharePoint, OS, and browser. We'll use your feedback to double-check the facts, add info, and update this article.


