
If you're trying to schedule a meeting with multiple people or search for a room or other resources for your meeting, the Scheduling Assistant in Outlook on the web can help.
Note: If the instructions don't match what you see, you might be using an older version of Outlook on the web. Try the Instructions for classic Outlook on the web.
-
At the bottom of the page, select

-
At the top of the page, select New event.
-
In the Invite people box, enter the names or email addresses of the people you want to invite.
Select Optional to add optional attendees.
-
On the side of the event form, view your events and other attendees' busy information in day view. Attendee's busy information appears in red on top of your calendar events.
-
Click anywhere on the grid to select a new time for the event.
The Scheduling Assistant can be used before or after you provide event details. If you provide the date, time, and duration of your event, and add attendees before you open the Scheduling Assistant, those details are carried over and you can change them as needed.
By using the Scheduling Assistant, you immediately get to view the calendar of an attendee and determine their availability—free or busy—for the date and time of the event.
Open the Scheduling Assistant
-
At the bottom of the page, select
-
At the top of the page, select New event.
-
At the top of the event form, select Scheduling Assistant.
In the Scheduling Assistant, you can add attendees and a room, and change the date and time of the event, but you can't change the event title.
Add attendees
-
In the Scheduling Assistant, select Add required attendee or Add optional attendee.
-
Type the name or email address of the person you want to add and press Enter.
Add a room
-
In the Scheduling Assistant, select Add a room.
-
Choose a room from the list. You can change buildings by selecting the drop-down menu at the top of the list.
When you select a room list, the Scheduling Assistant will show the conference rooms and their availability.
View calendars
As you add attendees and a location, their calendar information will appear in the calendar grid.
-
Select the date at the top of the Scheduling Assistant to choose a new date for your meeting. In the calendar, select the month or use the up or down arrows to change the month.
-
Select the start time or end time to change when the meeting begins or ends.
-
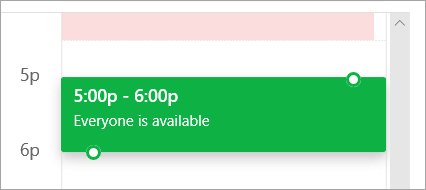
Use the scroll bar at the bottom of the Scheduling Assistant to see attendees' availability before or after the time you've selected.
-
Alternately, you can select a date and time directly on the grid, and resize the selection on the grid to change duration of the event.
Send your meeting invitation
-
Select Done to save your changes and close the Scheduling Assistant.
-
Select Send to send the meeting invitation.
Instructions for classic Outlook on the web
The Scheduling Assistant can be used before or after you provide event details. If you provide the date, time, and duration of your event, and add attendees before you open the Scheduling Assistant, those details are carried over and you can change them as needed.
By using the Scheduling Assistant, you immediately get to view the calendar of an attendee and determine their availability—free or busy—for the date and time of the event.
-
On the Mail or Calendar toolbar, select New

-
On the Details page for the new event, do one of the following:
-
Add event details—for example, title and location, start and end date and times, and other information—as needed, add people, and then select Scheduling assistant

-
Select Scheduling assistant
-
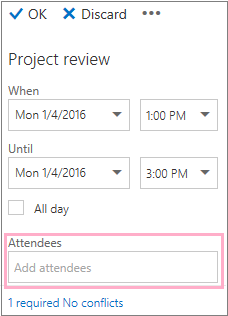
In the details pane of the Scheduling Assistant, you can change the date and time an event occurs, but you can't change the title of the event. The Details page for the event offers options that aren't available with the Scheduling Assistant. Those options include, for example, setting a meeting reminder, adding an email reminder to send, and providing a description or other details about the event.
Attendees can be added for an event before or after you select the Scheduling Assistant. If you added attendees on the Details page for the event, when you open the Scheduling Assistant you'll see the calendars of those attendees in a grid to the right of the details pane. The steps given in this section are exclusively for adding an attendee after you open the Scheduling Assistant.
-
In the Attendees box in the details pane, type the name of a person you want to invite to the event.
Note: Beginning with the first character you type, Outlook matches your entry and offers the names of people who are in your organization or people with whom you have corresponded.
-
Choose a name in the list of suggestions that appears below the Attendees box, or choose Search Directory.
Note: Each person you add will automatically be added as Required. And each person's calendar appears (in the order in which they were chosen) to the right of your calendar in the calendar pane, creating a grid. As you add people you’ll see a count of the total number of people invited and how many conflicts there are.

-
To change the status of an attendee, right-click the name of the attendee, or if you're using a touch device, touch and hold the name , and do one of the following:
-
Choose Remove to delete the attendee. Or, choose Remove

-
Choose Attendance optional.
-
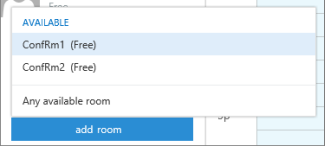
If you didn't add a room to the event location before opening the Scheduling Assistant, you can add one here. There is an Add room button at the bottom of the Scheduling Assistant details pane that lets you see conference rooms from your organization’s address list. The Scheduling Assistant automatically shows only rooms that are available at the time you’ve currently set, but you can see other rooms if you want to.
If your organization has more than a few rooms, the admin for your organization may have organized the rooms into room lists. Room lists are collections of rooms that typically include similar characteristics, such as rooms that are in the same building.
-
Choose Add Room.
-
Choose a room, or choose a room list, and then select one of the available rooms in that list.
After you’ve selected a room, it's added to the calendar grid. You can change the conference room by choosing Change room. To remove the conference room, right-click it or, if you’re using a touch device, touch and hold it, and then select Remove.
As you add attendees and a location, their calendar information will appear in the calendar grid.

You can select day or week view at the top of the calendar. If you select week view, the calendar grid will show a merged view of the attendees’ calendars.
When you’ve finished working in the Scheduling Assistant, do one of the following:
-
Select OK

-
Select Discard to cancel.
You’ll be returned to the new event Details page, where you can finish adding more details about your meeting if necessary. When you’re done, do one of the following:
-
Select Send to send the invitation to the event.
-
Select Discard to cancel all your changes.


