
Sometimes you might want to fit a picture into a space in a newsletter or brochure without distorting the picture or changing the way it looks.
You can resize or crop to change the size of a picture. Resizing changes the dimensions of the picture by stretching or shrinking it, while cropping reduces the size of the picture by removing the vertical or horizontal edges. Cropping is often used to hide or trim a part of a picture, either for emphasis or to remove unwanted portions.
-
Click the picture, and click Picture Tools Format > Crop.
-
Position the cropping handle over an edge or corner.
-
Do one of the following:
-
To crop one side, drag the center handle on that side.
-
To crop evenly on two sides at once, hold down the Ctrl key as you drag a center handle.
-
To crop all four sides of your picture evenly and at the same time, press Ctrl+Shift while you drag a corner handle.
Notes:
-
Release the mouse button to see the cropped picture.
-
Click the Crop tool to see only the cropped picture. To view entire picture again, click the Crop tool again. The picture shows the cropped portion clearly and the rest of the picture as a transparent image.
-
Fit, Fill, Pan, and Rotate tools
Fit
If your picture is larger or smaller than the picture frame you can resize the picture to fit without changing the way it looks.
-
Click the picture, and click Picture Tools Format > Fit.

The picture is resized to fit in the picture frame.

Note: For the picture to stay mostly the same, some outside portions of the picture might be cropped.
Fill
Use the Fill tool to fill a picture area without changing the way the picture looks.
-
Click the picture, and click Picture Tools Format > Fill.
The picture is resized to fill the picture area.

Note: For the picture to stay mostly the same, some outside portions of the picture might be cropped.
Pan
You can center the picture while you’re using the crop tool.
-
Click the picture, and click Picture Tools Format > Crop.
-
Move the mouse pointer over the picture until it changes to the Move pointer.
-
Click and drag the picture to position the picture where you want it.
Note: To continue cropping, click the crop handles so they become the focus.
Rotate
You can rotate the picture while you’re using the crop tool.
-
Click the picture, and click Picture Tools Format > Crop.
-
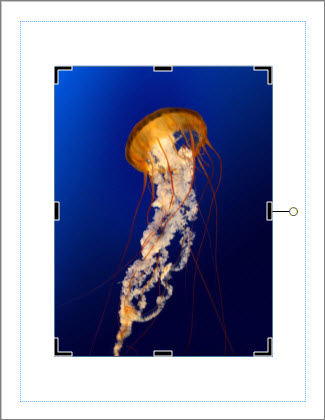
Point to the green rotation handle, and drag the mouse in the direction you want the object to rotate.
Note: To rotate in 15 degrees at a time, press Shift while you drag the handle.
You can use these features to crop a picture — Crop, Fit, Fill, Pan, and Rotate.
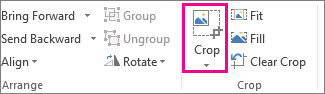
Crop
When you select a picture in Publisher 2010 a new Picture Tools ribbon tab becomes available. The Crop tool is in the Crop group on the far right of this new tab.
To crop a picture:
-
Select the picture to be cropped.
-
Point to the Picture Tools tab that appears on the ribbon.
-
Click the Crop button.
-
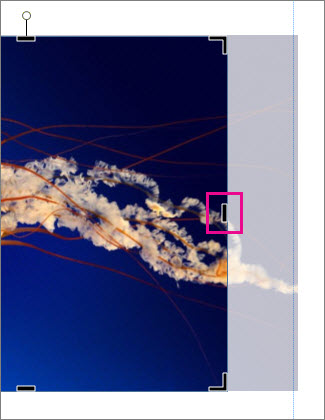
Position the cropping handle over an edge or corner.

-
Do one of the following:
-
To crop one side, drag the center handle on that side.
-
To crop evenly on two sides at once, hold down CTRL as you drag a center handle.
-
To crop all four sides simultaneously and maintain the proportions of your picture, hold down CTRL+SHIFT while you drag a corner handle.
Note:
When you release the mouse button, the picture is cropped.
When you deselect the crop tool the picture will only show your cropped section. However, if you select the picture and click the crop tool again the entire picture will show, with the cropped portion showing clearly and the remainder of the picture as a washed out transparency.
-
Fit
If your picture is larger or smaller than the picture area Publisher 2010 allows you to quickly resize the picture to fit while maintaining the original aspect ratio.
-
Select the picture.
-
Point to the Picture Tools tab that appears on the ribbon.
-
In the Crop group, click the Fit button.
-
The picture is resized to fit in the picture area.
Note: Because the picture maintains its aspect ratio, this may result in outcropping. .
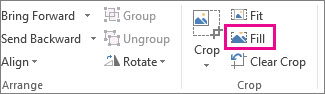
Fill
To quickly fill a picture area while maintaining the original aspect ratio you can use the Fill tool.
-
Select the picture.
-
Point to the Picture Tools tab that appears on the ribbon.
-
In the Crop group, click the Fill button.
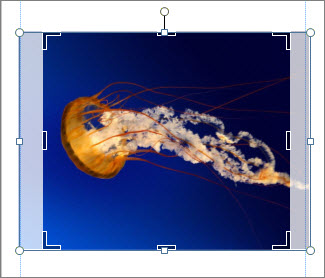
-
The picture is resized to fill the picture area.
Note: Because the picture maintains its aspect ratio while filling the picture area, any parts of the picture that fall outside the picture area will be cropped.
Pan
While using the crop tool you can move the picture within the cropped picture area to make sure that the picture is centered the way you want.
-
Select the picture.
-
Point to the Picture Tools tab that appears on the ribbon.
-
Click the Crop button.
-
Position the mouse pointer over the object until the pointer changes to the Move pointer.
-
Click and drag the picture to position it within the crop handles.
Note: After you do this, the picture will have focus instead of the cropping frame. To go back to cropping, click on the crop handles again, so that they become the focus.
Rotate
You can also rotate the picture while using the crop tool.
-
Select the picture.
-
Point to the Picture Tools tab that appears on the ribbon.
-
Click the Crop button.
-
Point to the green rotation handle.
-
Drag the mouse in the direction you want the object to rotate.
Note: To rotate in 15-degree increments, hold down SHIFT while dragging the handle.
Although Microsoft Office Publisher 2007 has some basic photo editing capabilities that allow you to crop a picture to a rectangular shape, it is not a photo editing program. However, there are ways to create a nonrectangular picture.
Note: You cannot crop an AutoShape, WordArt object, or animated GIF in your publication. To crop an animated GIF, use an animated GIF editing program, and then insert the file again.
Crop a picture to a rectangular shape
-
Select the picture.
When you select a picture, the Picture toolbar appears.

-
On the Picture toolbar, click Crop

-
Position the cropping handle over an edge or corner.
1. Cropping handle
-
Do one of the following:
-
To crop one side, drag the center handle on that side.
-
To crop evenly on two sides at once, hold down CTRL as you drag a center handle.
-
To crop all four sides simultaneously and maintain the proportions of your picture, hold down CTRL+SHIFT while you drag a corner handle.
Note: When you release the mouse button, the picture is cropped.
-
Crop a picture to a non-rectangular shape
To crop a picture to a non-rectangular shape such as a star or circle, you have to do one of the following:
-
Insert a picture into a shape, such as a circle.
-
Use the photo editing features in Office Publisher 2007 with Digital Imaging, Microsoft Digital Image Pro, or another photo editing program, and then insert the cropped pictures into a publication. Be sure to check the Help in your photo editing program for more information about how to crop a picture.


