Flowcharts are diagrams that show the steps in a process. Basic flowcharts are easy to create and, because the shapes are simple and visual, they are easy to understand.
Note: You can also automatically create a basic flow chart from data by using a Data Visualizer diagram in Visio. For more information, see Create a Data Visualizer diagram.
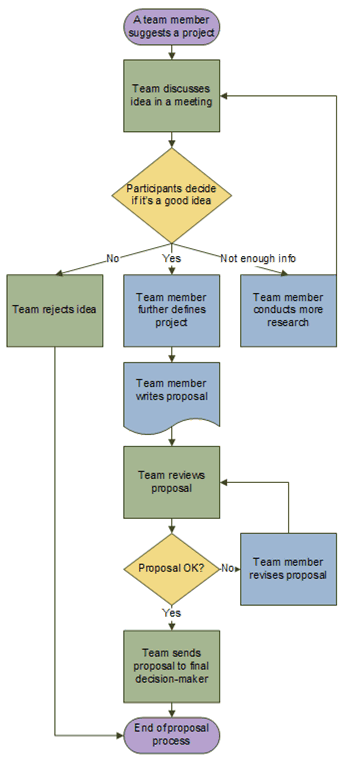
The Basic Flowchart template in Visio comes with shapes that you can use to show many kinds of processes, and it is especially useful for showing basic business processes like the proposal development process shown in the following figure.
Create a flowchart
-
Start Visio.
-
Select the Flowchart category.
-
Double-click Basic Flowchart.
-
For each step in the process that you are documenting, drag a flowchart shape onto your drawing.
-
Connect the flowchart shapes by holding the mouse pointer over the first shape, and then selecting the small arrow that appears that points to the shape you want to connect to. If the second shape is not directly across from the first shape, select and hold the small arrow, drag it to the second shape, and drop the connector in the middle of the second shape.
-
To add text to a shape or connector, select it, and then type. When you are finished typing, select a blank area of the page.
-
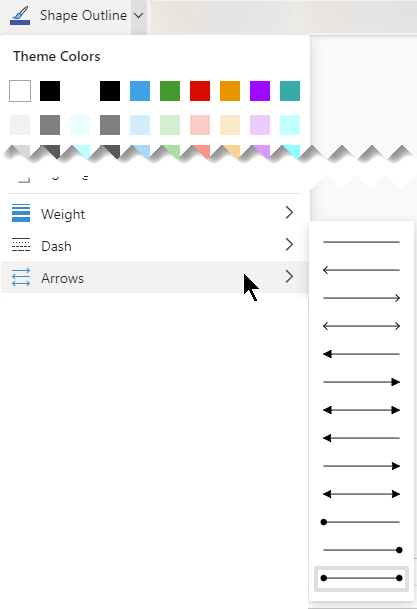
To change the direction of a connector's arrow, select the connector, and then, on the Shape tab, in the Shape Styles group, select Line, point to Arrows, and select the arrow direction and style that you want.
Fix alignment and spacing
-
Select everything on the drawing page.
-
On the Home tab, in the Arrange group, select Position, and then select Auto Align & Space.
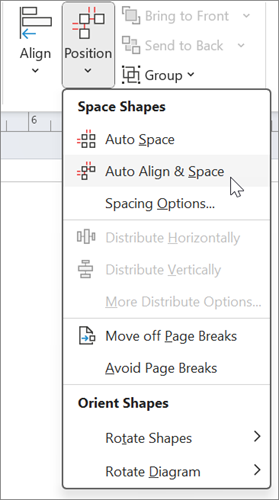
If the chart does not align properly, use the Undo function, and then try some of the other options under the Align and Position buttons.
What the flowchart shapes represent
When you open the Basic Flowchart template, the Basic Flowchart Shapes stencil opens too. Each shape on the stencil represents a different kind of step in a process. However, there is no standard, universal meaning for the shapes – any shape can carry whatever meaning is agreed on by the people who will create and read the flowcharts. Most flowcharts tend to use only three or four of the shapes, unless there is a clear business reason to use more.
That said, Visio shapes have names that suggest their most common uses. Here are some of the most common shapes:
-
Start/End Use this shape for the first and last step of your process.

-
Process This shape represents a typical step in your process. This is the most frequently used shape in almost every process.

-
Decision This shape indicates a point where the outcome of a decision dictates the next step. There can be multiple outcomes, but often there are just two — yes and no.

-
Subprocess Use this shape for a set of steps that combine to create a sub-process that is defined elsewhere, often on another page of the same document. This is useful if the diagram is very long and complex.

-
Document This shape represents a step that results in a document.

-
Data This shape indicates that information is coming into the process from outside, or leaving the process. This shape can also be used to represent materials and is sometimes called an Input/Output shape.
-
On-page reference This small circle indicates that the next (or previous) step is somewhere else on the drawing. This is particularly useful for large flowcharts where you would otherwise have to use a long connector, which can be hard to follow.

-
Off-page reference When you drop this shape onto your drawing page, a dialog box opens where you can create a set of hyperlinks between two pages of a flowchart or between a sub-process shape and a separate flowchart page that shows the steps in that sub-process.

See Also
Create a new flowchart
-
Start Visio for the web.
-
In the Gallery on the home page, scroll down to the Basic Flowchart category.
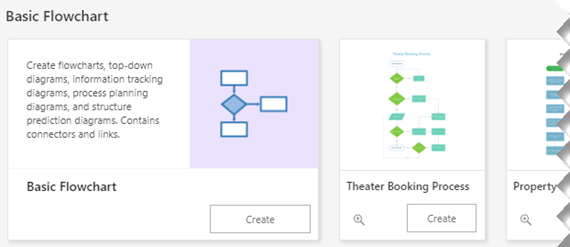
-
Choose an option from that row, then select its Create button.
The first option gives you stencil with standard shapes, plus a blank canvas to start with. The other options in the row provide a stencil and also a starter diagram with several shapes already added to the canvas.
Design the flowchart
-
For each step in the process that you are documenting, drag a flowchart shape onto your drawing.
-
Connect the flowchart shapes by hovering over the first shape, and then selecting the small arrow that appears that points to the shape you want to connect to. If the second shape is not directly across from the first shape, select and hold the small arrow, drag it to the second shape, and drop the connector in the middle of the second shape.
-
To add text to a shape or connector, select it, and then type. When you are finished typing, press the Esc key.
-
To change the direction of a connector's arrow, select the connector, and then, on the Shape tab, select the down arrow next to Shape Outline.
The Shape Outline gallery appears.
-
Point at Arrows, and then select the arrow style and direction you want.