
After you create an Excel table in your worksheet, you can easily add or remove table rows and columns.
You can use the Resize command in Excel to add rows and columns to a table:
-
Click anywhere in the table, and the Table Tools option appears.
-
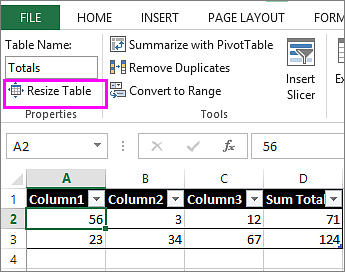
Click Design > Resize Table.
-
Select the entire range of cells you want your table to include, starting with the upper-leftmost cell.
In the example shown below, the original table covers the range A1:C5. After resizing to add two columns and three rows, the table will cover the range A1:E8.
Tip: You can also click Collapse Dialog


-
When you've selected the range you want for your table, press OK.
Add a row or column to a table by typing in a cell just below the last row or to the right of the last column, by pasting data into a cell, or by inserting rows or columns between existing rows or columns.
Start typing
-
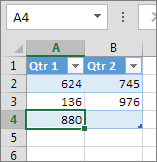
To add a row at the bottom of the table, start typing in a cell below the last table row. The table expands to include the new row. To add a column to the right of the table, start typing in a cell next to the last table column.
In the example shown below for a row, typing a value in cell A4 expands the table to include that cell in the table along with the adjacent cell in column B.
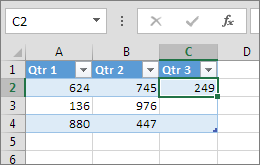
In the example shown below for a column, typing a value in cell C2 expands the table to include column C, naming the table column Qtr 3 because Excel sensed a naming pattern from Qtr 1 and Qtr 2.
Paste data
-
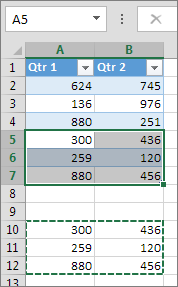
To add a row by pasting, paste your data in the leftmost cell below the last table row. To add a column by pasting, paste your data to the right of the table's rightmost column.
If the data you paste in a new row has as many or fewer columns than the table, the table expands to include all the cells in the range you pasted. If the data you paste has more columns than the table, the extra columns don't become part of the table—you need to use the Resize command to expand the table to include them.
In the example shown below for rows, pasting the values from A10:B12 in the first row below the table (row 5) expands the table to include the pasted data.
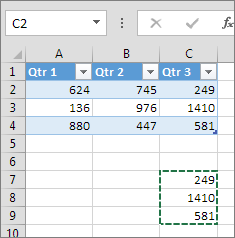
In the example shown below for columns, pasting the values from C7:C9 in the first column to right of the table (column C) expands the table to include the pasted data, adding a heading, Qtr 3.
Use Insert to add a row
-
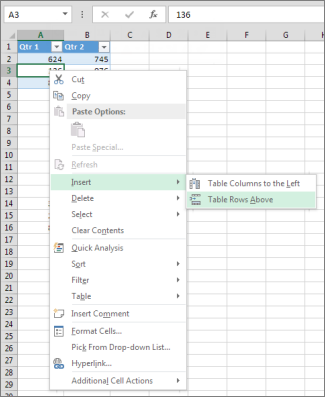
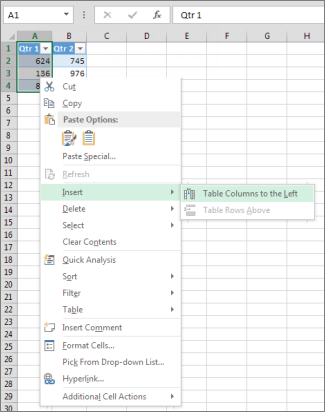
To insert a row, pick a cell or row that's not the header row, and right-click. To insert a column, pick any cell in the table and right-click.
-
Point to Insert, and pick Table Rows Above to insert a new row, or Table Columns to the Left to insert a new column.
If you're in the last row, you can pick Table Rows Above or Table Rows Below.
In the example shown below for rows, a row will be inserted above row 3.
For columns, if you have a cell selected in the table's rightmost column, you can choose between inserting Table Columns to the Left or Table Columns to the Right.
In the example shown below for columns, a column will be inserted to the left of column 1.
-
Select one or more table rows or table columns that you want to delete.
You can also just select one or more cells in the table rows or table columns that you want to delete.
-
On the Home tab, in the Cells group, click the arrow next to Delete, and then click Delete Table Rows or Delete Table Columns.

You can also right-click one or more rows or columns, point to Delete on the shortcut menu, and then click Table Columns or Table Rows. Or you can right-click one or more cells in a table row or table column, point to Delete, and then click Table Rows or Table Columns.
Just as you can remove duplicates from any selected data in Excel, you can easily remove duplicates from a table.
-
Click anywhere in the table.
This displays the Table Tools, adding the Design tab.
-
On the Design tab, in the Tools group, click Remove Duplicates.
-
In the Remove Duplicates dialog box, under Columns, select the columns that contain duplicates that you want to remove.
You can also click Unselect All and then select the columns that you want or click Select All to select all of the columns.
Note: Duplicates that you remove are deleted from the worksheet. If you inadvertently delete data that you meant to keep, you can use Ctrl+Z or click Undo 
-
Make sure that the active cell is in a table column.
-
Click the arrow

-
To filter for blanks, in the AutoFilter menu at the top of the list of values, clear (Select All), and then at the bottom of the list of values, select (Blanks).
Note: The (Blanks) check box is available only if the range of cells or table column contains at least one blank cell.
-
Select the blank rows in the table, and then press CTRL+- (hyphen).
You can use a similar procedure for filtering and removing blank worksheet rows. For more information about how to filter for blank rows in a worksheet, see Filter data in a range or table.
-
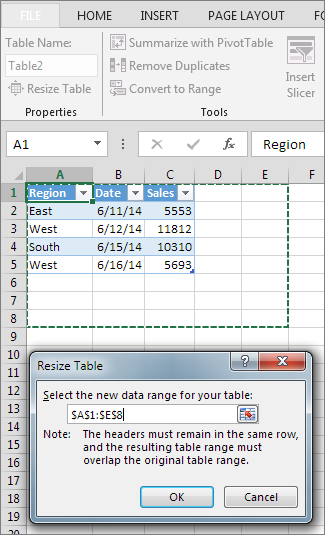
Select the table, then select Table Design > Resize Table.
-
Adjust the range of cells the table contains as needed, then select OK.
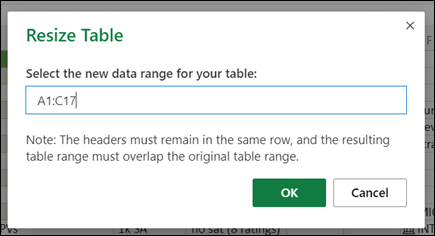
Important: Table headers can't move to a different row, and the new range must overlap the original range.
Need more help?
You can always ask an expert in the Excel Tech Community or get support in Communities.
See Also
How can I merge two or more tables?
Create an Excel table in a worksheet


