
This topic explains how to export text files by using the Export Wizard in Microsoft Access.
What do you want to do?
Understand exporting text files
You can export data from Access in a variety of formats, including Excel, Word, and SharePoint lists. However, you might need to export data to a program that uses a file format that Access does not support. In that case, if the destination program can use text (.txt) files, you can export your data in that format and open the resulting file with the second program.
You can export tables, queries, forms, and reports as text files. You can also export a selected portion of a datasheet view. When you export tables and queries, you have the option of exporting the entire object, or only the data without any additional formatting.
At the end of the operation, Access creates a text file (*.txt). If you choose to ignore formatting, you have the option of creating a delimited text file or fixed-width text file. If you choose to export formatted data, Access tries to approximate the layout of the source object.
The Export Wizard creates the following types of text files:
-
Delimited files In a delimited file, each record appears on its own line, and the fields are separated by a single character called the delimiter. The delimiter can be any character that does not appear in the field values, such as a comma or semi-colon.
1,Company A,Anna,Bedecs,Owner
2,Company C,Thomas,Axen,Purchasing Rep
3,Company D,Christina,Lee,Purchasing Mgr.
4,Company E,Martin,O’Donnell,Owner
5,Company F,Francisco,Pérez-Olaeta,Purchasing Mgr.
6,Company G,Ming-Yang,Xie,Owner
7,Company H,Elizabeth,Andersen,Purchasing Rep
8,Company I,Sven,Mortensen,Purchasing Mgr.
9,Company J,Roland,Wacker,Purchasing Mgr.
10,Company K,Peter,Krschne,Purchasing Mgr.
11,Company L,John,Edwards,Purchasing Mgr.
12,Company M,Andre,Ludo,Purchasing Rep
13,Company N,Carlos,Grilo,Purchasing Rep
You only have the option of creating a delimited file when you export the contents of a table or query without formatting. A delimited file contains all of the records and fields in the underlying object. Hidden columns and filtered rows are exported along with all of the other data.
-
Fixed-width files In a fixed-width file, each record appears on a separate line, and the width of each field remains consistent across records. In other words, the length of the first field of every record might always be seven characters, the length of the second field of every record might always be 12 characters, and so on. If the actual values of a field vary from record to record, the values that fall short of the required width will be padded with trailing spaces.
1   Company A   Anna       Bedecs         Owner
2   Company C   Thomas     Axen           Purchasing Rep
3   Company D   Christina  Lee            Purchasing Mgr.
4   Company E   Martin     O’Donnell      Owner
5   Company F   Francisco  Pérez-Olaeta   Purchasing Mgr.
6   Company G   Ming-Yang  Xie            Owner
7   Company H   Elizabeth  Andersen       Purchasing Rep
8   Company I   Sven       Mortensen      Purchasing Mgr.
9   Company J   Roland     Wacker         Purchasing Mgr.
10  Company K   Peter      Krschne        Purchasing Mgr.
11  Company L   John       Edwards        Purchasing Mgr.
12  Company M   Andre      Ludo         Purchasing Rep
13  Company N   Carlos     Grilo          Purchasing Rep
You only have the option of creating a fixed-width file when you export the contents of a table or query without formatting. A fixed-width file contains all of the records and fields in the underlying object. Hidden columns and filtered rows are exported along with all of the other data.
-
Formatted files In a formatted file, hyphens (-) and pipe characters (|) are used to organize the content in a grid. The records appear as rows, and fields appear as columns. The field names appear in the first row.
--------------------------------------------
|   ID    |         E-mail Address         |
--------------------------------------------
|       1 | nancy@northwindtraders.com     |
--------------------------------------------
|       2 | andrew@northwindtraders.com    |
--------------------------------------------
|       3 | jan@northwindtraders.com       |
--------------------------------------------
|       4 | mariya@northwindtraders.com    |
--------------------------------------------
|       5 | steven@northwindtraders.com    |
--------------------------------------------
|       6 | michael@northwindtraders.com   |
--------------------------------------------
|       7 | robert@northwindtraders.com    |
--------------------------------------------
|       8 | laura@northwindtraders.com     |
--------------------------------------------
|       9 | anne@northwindtraders.com      |
--------------------------------------------
You only have the option of creating a formatted file when you choose to export the data in a table, query, form, or report along with the formatting. A formatted file includes only those records and fields that are included in the source object or displayed in the current view. Hidden columns and filtered rows are not exported.
Export data to a text file
The process of exporting data as a text file follows these broad steps:
-
Open and review the source database
-
Run the export wizard
-
Save your export settings and review the text file
The following sets of steps explain how to perform each task.
Open and review the source database
-
Open the source database in Access.
-
In the Navigation Pane, select the object that contains the data that you want to export. You can export a table, query, form, or report.
Note: You can export only one database object in a single export operation. When you export a form or datasheet that contains subforms or subdatasheets, only the main form or datasheet is exported. You must repeat the export operation for each subform and subdatasheet that you want to view in the text file. On the other hand, when you you export a report, subforms and subreports that are included in the report are exported along with the main report.
-
Review the source data to make sure it does not contain error indicators or values.
If the data contains errors, make sure you resolve them before you export the data. Otherwise, null values will appear in the text file.
-
If the source object is a table or query, decide whether you want to export the data with or without the object's formatting.
This decision affects three aspects of the resulting file — the type of text file that the process creates, the amount of data that is exported, and the display format of the data. The following table describes the outcome of exporting formatted and unformatted data.
Export formatted
Source object
Resulting file type
Fields and records
Formatting
No
Must be either a table or query.
Delimited file or fixed-width file
All fields and records in the underlying object are exported.
Format property settings are ignored during the export operation.
For lookup fields, only the lookup ID values are exported.
Yes
Can be a table, query, form, or report.
Formatted file
Only fields and records that are displayed in the current view or source object are exported.
Wizard respects the Format property setting of each column.
Rich text formatting is ignored.
For lookup fields, the lookup values are exported.
Hyperlinks may be truncated in the text file.
-
To export only a portion of a table, query, or form, open the object in datasheet view, and then select only the records that you want.
Run the Export Wizard
-
In the Access Navigation Pane, right-click the source object, point to Export, and then click Text File. You can also launch the Export - Text File wizard by highlighting the source object in the Navigation Pane and then on the External Data tab, in the Export group, click Text File.
Access opens the Export - Text File dialog box.
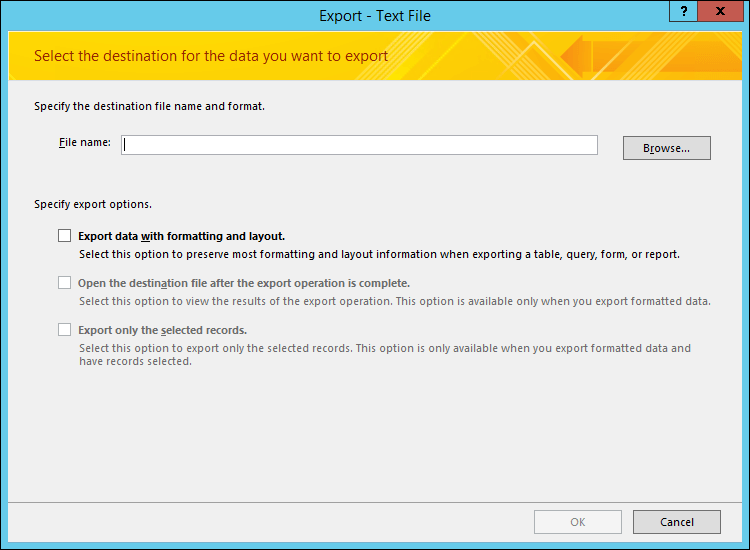
-
In the Export - Text File dialog box, accept or change the name that Access suggests for the text file.
-
If you are exporting a table or a query, and you want to export data with formatting and layout, select the Export data with formatting and layout check box. If you are exporting a form or a report, the option is always selected, but appears dimmed.
Note: If you don't select the first check box, you can't select the second or third check boxes.
-
To view the destination text file after the export operation is complete, select the Open the destination file after the export operation is complete check box.
-
If the source is a datasheet, and you selected some records in the open datasheet before starting the export operation, you can select the Export only the selected records check box. However, if you want to export all of the records that are in the datasheet view, leave the check box unselected.
Note: This check box is unavailable (appears dimmed) if none of the records in the source datasheet are selected, or if the source is not a datasheet.
-
Click OK.
-
If a text file that you specify in step 2 already exists, Access prompts you to overwrite the file. Click Yes to overwrite, or click No to return to the Export - Text File dialog box to specify a different name.
Important: You cannot append data to an existing text file.
-
If you are exporting data with formatting and layout, you are asked to choose the encoding to be used for saving the file. Either accept the default, or select the option that you want, and then click OK.
Access exports the data, and displays the status on the final page of the wizard.
-
If you choose to export the data without any formatting or layout, the Export Text Wizard starts and prompts you to select the type of text file that you want to create. Click Delimited or Fixed-Width, and then click Next.
The choice you make usually depends on the system that works with the exported files. Some programs work with delimited files, and some will work with either delimited or fixed-width. If users need to look at the data, a fixed-width file can be much easier to read than a delimited file.
-
Do one of the following sections, based on the choice you made in the previous step:
-
Delimited
-
Under Choose the delimiter that separates your fields, select or specify the character that delimits the fields - Tab, Semicolon, Comma, Space, or Other.
-
To include the field names in the text file, select the Include Field Names on First Row check box.
-
In the Text Qualifier list, select the text qualifier (the character that is used to enclose text values). If your source data includes multivalued fields, and if you chose the semicolon as the delimiting character, selecting a text qualifier is very important, because enclosing the value list in a pair of single or double quotation marks helps to keep the values in the value list together.
-
-
Fixed-width
-
Review and position the vertical lines that separate the fields. If necessary, scroll to the right to see all of the fields.
-
-
-
On the last page of the wizard, you can edit the file name and path for the text file, or just leave it as it is and click Next.
-
Click Finish. Access exports the data, and displays the status of the export operation on the final page of the wizard.
What else should I know about exporting?
-
For information on how to save the details of your export into a specification that you can reuse later, see the article Save the details of an import or export operation as a specification.
-
For information on how to run saved export specifications, see the article Run a saved import or export operation.
-
For information on how to schedule specifications to run at specific times, see the article Schedule an import or export operation.
-
For information on how to change a specification name, delete specifications, or update the names of source files in specifications, see the article Manage Data Tasks.
Troubleshoot missing and incorrect values in a text file
The following table describes various ways of troubleshooting common errors.
Tip: If you find that just a few values are missing, fix them in the Excel file. Otherwise, fix the source object in the Access database, and then repeat the export operation.
|
Issue |
Description |
|
Missing field names |
In a fixed-width file, the field names are missing. Manually add them to the text file. In a delimited file, the field names are included if you select the Include Field Names on First Row check box in the wizard. |
|
Display of multivalued fields |
By default, fields that support multiple values are exported as a list of values separated by semicolons (;) and enclosed in double quotation marks (""). If you set the field delimiter to be the semicolon, and if you changed the text qualifier to None, each value in the multivalued list might appear to belong to an individual field. Either change the delimiter settings and run the export operation again, or manually enclose the values of the multivalued field in the text file in double quotes. |
|
Missing pictures, objects, and attachments |
Graphical elements (such as a logo, the contents of OLE object fields, and attachments that are part of the source data) are not exported. |
|
Missing Graph |
When you export a form or a report that contains a Microsoft Graph object, the Graph object does not get exported. |
|
Missing expressions |
The expression that is used to calculate the values is not exported to the text file. Only the results of the expressions are exported. Manually add the formula to the text file after completing the export operation. |
|
Missing subforms and subdatasheets |
When you export a form or a datasheet, only the main form or datasheet is exported. Repeat the export operation for each subform and subdatasheet that you want. |
|
1 and 0 values appear in Yes/No fields |
When you export data to a delimited or fixed-width file, the values in Yes/No fields appear as 1 (True or Yes) and 0 (False or No). In the text file, perform a search-and-replace operation to correct the values. |
|
Null values |
Check the source file to see whether the corresponding value appears correctly in the source field. If you see an error value or an unsupported value, correct the source, and then try exporting again. |


