
A connector is a line that connects two shapes and stays connected to the shapes that you attach it to. The three types of connectors are straight, elbow (angled), and curved. Connection points appear at the ends of a connector, and additional connection points are indicated by circular dots when you move your mouse pointer over a shape. These dots indicate where you can attach a connector to a shape. Connection points may be green, red, or blue, depending on the program and version you're using.
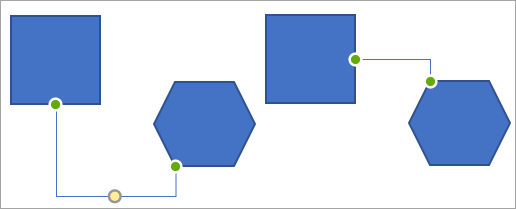
Here's an example of two connected shapes, before and after their connector was rerouted:
Although connectors remain attached to and move with shapes, you may want to automatically reroute or manually move connectors to make more direct connections and keep connectors from crossing shapes.
Automatically reroute a connector to the closest points between shapes
-
Select the connected shape or connector that you want to reroute.
If multiple connectors are attached to a shape, select only the connectors that you want to reroute.
-
Under Drawing Tools, on the Format tab, in the Insert Shapes group, click Edit Shape

Note: In Word and Outlook, shapes can only be connected by connection points when the lines and the objects they are connecting were placed on a drawing canvas. If you don't see the Reroute Connectors option, the shapes might not be attached with a connector because they're not on a drawing canvas. For more information, see Draw or delete a line or connector.
Manually move a connector
To manually move a connector, detach either end from a shape, and then attach the end to another connection site on the same shape, or attach it to a different shape.
-
Click the connector that you want to move, and then do one of the following:
-
To move one end of the connector, drag the end, and then click to connect it to another connection point on the same shape or on a different shape.
Attached connection points on the line appear as solid colored circles. Unattached connection points on the line appear transparent circles. (In Word 2007 and Outlook 2007, unattached connection points are green.)
-
To detach the entire connector, drag its middle.
Notes:
-
If you detach the connector, it will maintain its shape, and it can be only manually reattached to connection points.
-
To prevent the end of a connector from locking automatically and moving when you move a shape, hold ALT while you drag the end. You can place the end anywhere on the shape without connecting the end to the shape, so the end will not move if you move the shape again.
-
An adjustment handle is a round or diamond-shaped handle located between connection points that you can use to adjust the appearance, but not the size, of most shapes. If the connector has a yellow adjustment handle, dragging the adjustment handle changes the shape of the connector, but does not detach the connector.
-
-


