
You can use Project groups to categorize and report project information in a variety of ways. Grouping also allows you to view rolled-up summary information of tasks, resources, or assignments in sheet views.
What do you want to do?
Group tasks or resources by one criterion
-
On the View tab, in the Task Views or Resource Views group, choose the view you want.
-
To group tasks, select a sheet view such as the Gantt Chart, Task Sheet, or Task Usage view. You can also group tasks in the Network Diagram view.
-
To group resources, select a sheet view such as the Resource Sheet or Resource Usage view.
-
-
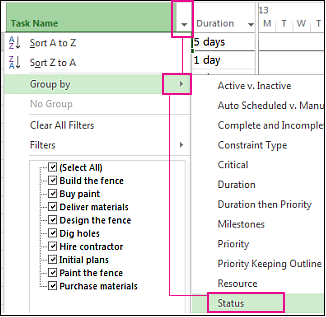
On the View tab, in the Data group, select the group you want from the Group by box.
Here's an example of grouping by Status:
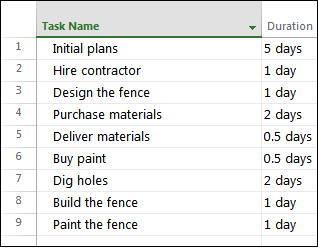
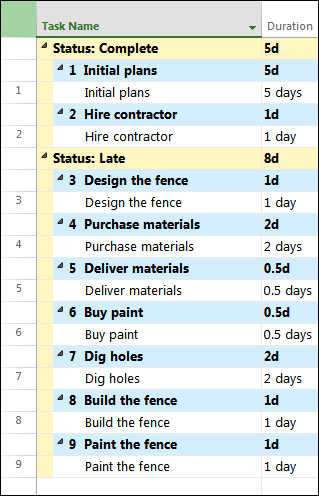
And here's a before and after view of a project grouped by task status.
Before:
After:
Group tasks or resources by multiple criteria
-
On the View tab, in the Task Views or Resource Views group, choose the view you want.
-
To group tasks, select a sheet view such as the Gantt Chart, Task Sheet, or Task Usage view. You can also group tasks in the Network Diagram view.
-
To group resources, select a sheet view such as the Resource Sheet or Resource Usage view.
-
-
On the View tab, in the Data group, choose More Groups in the Group by box.
-
Do one of the following:
-
Under Groups, choose Task or Resource, select a grouping criterion, and then choose Edit.
-
Under Groups, choose Task or Resource, and then choose New to create a new group.
-
-
In the Group By row, in the Field Name column, select one of the fields you want to use to group tasks or resources.
-
In the Then By row (below the Group By row), in the Field Name column, select an additional field you want to use to group tasks or resources.
-
In the Order column, select Ascending or Descending for each field.
-
To select formatting options for each field, select the Field Name column in the Group By or Then By row, and then, under Group by setting for, choose the options you want in the Font, Cell background, and Pattern boxes.
-
Add more levels of grouping by completing additional Then By rows.
-
Choose Save, and then choose Apply.
-
To return the view to its ungrouped state, in the Group By box, choose No Group.
Group assignments
-
On the View tab, in the Task Views or Resource Views group, choose the view you want. To group assignments, select the Task Usage or Resource Usage view.
-
On the View tab, in the Data group, choose More Groups in the Group by box.
-
Under Groups, choose Task or Resource, select a grouping criterion, and then choose Edit.
-
Select the Group assignments, not tasks or Group assignments, not resources check box.
-
Choose Save, and then choose Apply.
-
To return the view to its ungrouped state, in the Group By box, choose No Group.
Tips on grouping
|
Tip |
How to do it |
|
Remove grouping |
Choose View > Group by > No Group. |
|
Grouping in the Network diagram |
In the Network diagram, choose View > Group by. |


