
SharePoint Designer 2013 is a web and application design program used to build and customize SharePoint sites and applications. With SharePoint Designer 2013, you can create data-rich pages, build powerful workflow-enabled solutions, and design the look and feel of your site.
SharePoint Designer 2013 delivers a unique site authoring experience by providing one place where you can create a site; customize the components that make up the site; design the logic of the site around a business process; and deploy the site as a packaged solution. You can do all this without writing a line of code.
Note: Most of the information here covers both SharePoint Designer 2013 and SharePoint Designer 2010. SharePoint Designer 2013 is designed for SharePoint 2013 sites and later. SharePoint Designer 2010 works on SharePoint 2010 sites.
In the following sections, you’ll learn about SharePoint Designer 2013 and how you can get started using it in your organization.
Downloading and installing SharePoint Designer 2013
SharePoint Designer 2013 replaces SharePoint Designer 2010. To get SharePoint Designer 2013, see Download and install SharePoint Designer 2013.
The SharePoint Designer 2013 experience
SharePoint sites are quickly becoming more complex as they scale to the needs of businesses of all types and sizes. They have moved from being a repository of documents, task lists, and schedules to become highly dynamic, data-rich, business process-driven sites.
For the site designer, this means not only understanding the needs of the business, but understanding SharePoint and all of the parts that make up one of its sites. It’s especially important to understand the relationships between the many moving parts of the site and to be able to manage this in one place.
SharePoint Designer 2013 provides a single environment where you can work on your site, its lists and libraries, pages, data sources, workflows, permissions, and more. Not only can you see these key ingredients of your site in one place, but you can see the relationships between these objects.
The framework is there for you to start designing and building highly customized business solution sites. Start by connecting to data sources, both inside and outside of SharePoint. Present this information to users and let them submit information back, using a SharePoint site or an Office client application. Create highly customized workflows that automate business processes. Lastly, customize the look and feel of the site so that it matches the branding of your organization.
By providing one environment for these tasks, you spend more time designing, building, and customizing solutions and less time searching for and updating the various components of a site using different tools and methods.
The following sections explore the SharePoint Designer 2013 experience and user interface:
SharePoint Designer 2013 is a client program that installs on your local computer. It is also tightly integrated with SharePoint. As such, it can be launched directly from your machine using Windows Start menu and various places in SharePoint, such as the Edit button on the Page menu.
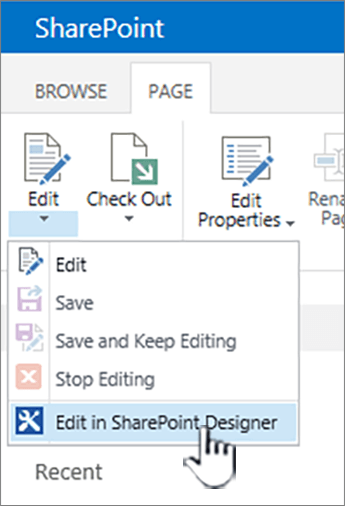
There are a number of places where you can open SharePoint Designer 2013, for example, when customizing lists, views, workflows, and master pages. If you haven’t installed SharePoint Designer 2013 yet, the first time you launch it from SharePoint, you’re prompted to download and install it from the web. The next time you open SharePoint Designer 2013, it opens immediately. It’s also available in the Windows Start menu.
Note: SharePoint Designer 2013 and its individual features can be restricted or disabled using the SharePoint Designer Settings page. If you’re not able to perform the tasks described in this article, this may be the reason. Contact your administrator for details.
When you open SharePoint Designer 2013 from the Windows Start menu, the first thing you see is the File tab. You have the option to customize an existing site or create a new site on this screen.
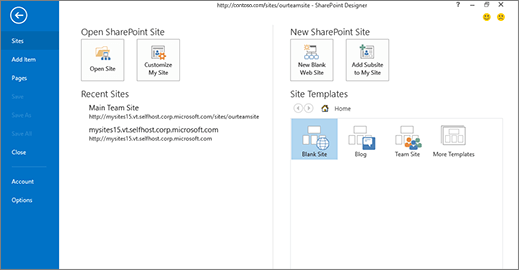
To customize an existing site, you can browse to an existing site, customize your My Site, or select one of the recent sites you’ve opened in SharePoint Designer 2013.
To create a new site, you can use a blank template, choose from a list of templates, or choose from one of the featured templates. From here, just specify the server and a site name and create the site. Your site is created and then opens in SharePoint Designer 2013.
If you open SharePoint Designer 2013 from SharePoint, you won’t see this screen. Instead, you’ll see your site open in the SharePoint Designer 2013 interface.
The SharePoint Designer 2013 interface
SharePoint Designer 2013 provides one environment where you can create, customize, and deploy SharePoint sites and solutions. This is made possible by the user interface, which shows all of the components that make up your site and the relationships between those components.
When you first open your site, you see a summary of the site, including its title, description, current permissions, and subsites.
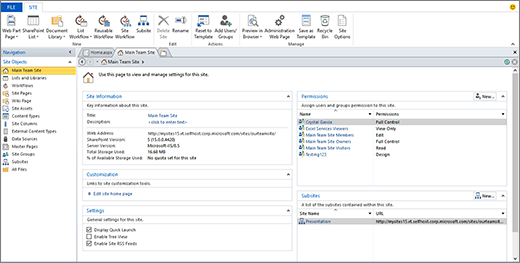
Three-part interface: Navigation, Summary, and Ribbon
There are three main areas of the SharePoint Designer 2013 interface that you work in to design and build sites:
-
Navigation pane is used to navigate the major parts, or components, of your site
-
Gallery and Summary pages to see lists of each component type and summaries of one particular component.
-
Ribbon to perform actions on the selected component.
The Navigation pane shows the components that make up your site–its lists, libraries, content types, data sources, workflows, and more. To edit one of the components, an Announcements list for example, you open Lists and Libraries, and this takes you to a gallery page showing all lists and libraries.
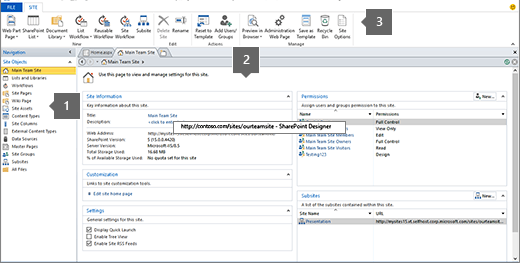
From there, you can open the Announcements list, and this takes you to a summary page for that list. On the summary page, you see its associated views, forms, workflows, and more. To edit one of the views, just open it directly from this page.
With the view open, you'll notice that the Ribbon changes to display the most common and contextually relevant editing tasks for editing views. If you’re familiar with the Ribbon in Microsoft Office applications, you know that it makes creating and editing tasks quick and easy. When you’re finished editing, use the Back button or the breadcrumb-style navigation at the top of the page to return to the summary of your site.
The SharePoint Designer 2013 interface makes it easy to identify the various components of a site, drill down and edit one of those components, and then return back to the main view of the site.
In addition to working on the various objects of your site in SharePoint Designer 2013, you may want to view and access larger site or application settings. This includes opening another site, adding pages, importing files, and changing SharePoint Designer 2013’s application settings. You perform these actions on the File tab, which is the first screen you see if you open SharePoint Designer 2013 from the Windows Start menu.
Click the File tab in the upper left to go to this view. Click Back to return to the SharePoint Designer 2013 interface.
Pillars of customization in SharePoint Designer 2013
SharePoint Designer 2013 can be used to create and customize sites and solutions that contain application logic but don’t’ require writing code. You can use it to add and modify data sources, customize list and data views, build and deploy business workflows, design a corporate brand, and much more. But you really start to harness the power and capabilities of SharePoint Designer 2013 when you turn an out of the box site into a real business solution for your organization.
The following sections cover the pillars of customization when designing and building solutions using SharePoint Designer 2013.
Connect to data inside and outside of SharePoint
With SharePoint Designer 2013, you can connect to numerous data sources and then integrate that data into your site and Office client applications. Your users, as a result, can see and interact with business data on your site and from within the programs you choose rather than having to connect to those data sources separately.
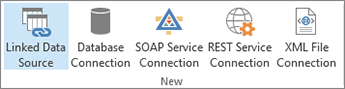
Directly from the Ribbon, you can connect to an external database, SOAP Service, REST Service, and more.
Connecting to data sources is a powerful feature of SharePoint Designer 2013 because there are so many supported options you can use to make data available to your users. With data connections, you can bring together lists and libraries, external databases and data sources, web services, and more.
Here’s a preview of the data sources you can connect to using SharePoint Designer 2013.
Lists and libraries are a common data source you’ll use on your site. They’re unique compared to the other data sources in that they’re already part of SharePoint and use the same database as SharePoint. You don’t need to perform any additional steps to create a connection to these data sources – just add them using the Lists and Libraries gallery in SharePoint Designer 2013 or add them in the browser. Once you create a list or library, you can customize its associated columns, content types, and other schema attributes.
Note: This feature is not available in all implementations of SharePoint Technologies. For more information, contact your service administrator.
Business Connectivity Services (BCS) is a SharePoint-based framework that provides standardized interfaces to existing business data and processes. With BCS, you can connect external business data sources—SQL Server, SAP and Siebel, web services, and custom applications—to SharePoint sites and Office applications.
In SharePoint Designer 2013, you connect to the external data by creating external content types. External content types represent the data in the external data source by storing the details of the connection, objects used in the business application, methods to create, read, update, or delete, and actions users can take on the objects themselves.
The external content type is stored in the Business Data Catalog. Once you create the external content type, you and others in your organization can easily create SharePoint lists, views, forms, workflows, and even Office client integration based on it. The external data becomes part of SharePoint like any other component, which allows you to create completely customized user interfaces to these external data sources.
Adding a database as a data source allows you to integrate data from another database to your site. You can connect to Microsoft SQL Server, Oracle, and any database that supports the OLE DB or ODBC protocols. You just need to know the name of the server where the database is located, the data provider, and the type of authentication to use. Once you add and configure the database as a data source, you create views and forms that allow your users to read and write data back to the data source without ever leaving the SharePoint site.
Simple Object Access Protocol (SOAP) is a protocol for exchanging XML-based messages, making it possible to connect to various data sources using an XML web service. In SharePoint Designer 2013, you can use this to connect to a data source on another site in your organization or a site on the Internet regardless of its technology, programming language, or platform. You could use an XML web service to display a currency converter, stock quote, calculator, or weather service on your site.
Representational state transfer (REST) is an architectural style of networked software that takes advantage of the technologies and protocols of the web, not just a method for building web services. You can use this type to get data from a site by reading a designated server-side script that describes the content. Similar to SOAP, you could use this in SharePoint Designer 2013 to connect to a data source on another site to display, for example, a currency converter, stock quote, calculator, or weather service. This type of data connection is simpler than SOAP to implement but is restricted to HTTP.
If your organization stores data in XML files, you can connect to these files as a data source in SharePoint Designer 2013. To connect to the XML files as a data source, you can create them directly in SharePoint Designer 2013, import them from a location on your computer or network, or connect to them on an external location.
Create data-rich interfaces
Once you establish connections to the necessary data sources, you’re ready to create interactive, data-rich interfaces for your users to these data sources. With SharePoint Designer 2013, you can create powerful and dynamic user interfaces for data sources, and you can make them available in a number of places, including your SharePoint site and custom windows, panes, and fields in Office business applications.
The interfaces you create include custom views, forms, web Parts, navigation, and custom Office client windows and task panes. This kind of flexibility allows you to create completely customized user experiences to your business data.
You might combine multiple data sources into a single view, create dashboards with related item views, design custom forms tailored to individual roles, and customize the available toolbars and Ribbon commands associated with the data.
Here are the many ways you can customize the user interface associated with your data using SharePoint Designer 2013.
Views allow you to see data in different ways. Whether you’re looking at a list or library or an external data source, you can use views to show the information that is relevant to you and your users. In SharePoint Designer 2013, every view you create is a Data View that displays in XSLT (Extensible Stylesheet Language Transformation), and it leverages Microsoft ASP.NET technology. In a view, you can show and hide fields, sort, filter, calculate, apply conditional formatting, and more. There are several View Styles that you can choose from as well to quickly get started. Ultimately, you can create and customize any view to fit your data model, your users, and your business.
To collect information from users, you create forms. With highly customized web-based forms, users can easily write data back to a data source. Similar to views, you can customize the appearance of fields based on the state of the data, user role, and more. Forms can be used to display data, edit data, and create data, and you can design forms using SharePoint Designer 2013’s built-in forms editor (for .aspx files) or Microsoft InfoPath (for .xsn files). Forms can be created and customized for specific data sources, such as a task list, and they can be used to collect user information in a workflow, as explained later.
Using the Custom Action builder in SharePoint Designer 2013, you can create custom actions, such as links, icons, and scripts to the SharePoint Ribbon, toolbar, and list item menus. Anytime you add new functionality to the site, you can make it easier for your users to discover it and use it by exposing that functionality in a SharePoint menu. You can also use custom actions to encourage users to perform certain tasks on a given object, such as starting a workflow on a list.
web Parts are modular units of information—a self-contained data or feature—that is added to a SharePoint page. The views and forms described earlier are stored in web Parts, but in addition to these, you can add web Parts that perform a number of functions and ways to interact with data. Users can further customize web Parts in the browser if you add them to a web Part zone in SharePoint Designer 2013. web Parts and web Part Pages are a powerful and effective way to customize the web interface for your users in SharePoint.
For external data sources that use external content types, you can surface that information in client applications like Microsoft Outlook 2010 and SharePoint Workspaces. You can create an interface for users to read, write, and delete the external business data just as if it were part of the application. You do this with client forms, regions, and task panes. Your users, as a result, get to work with their business data on the sites and Office applications they know best and are already using.
Navigation plays a key part in the interfaces you create for your users, and it’s an area that you manage throughout SharePoint, not just SharePoint Designer 2013. For example, you might customize navigation links within a Data View or form, a web Part, a workflow, or at the site level, such as the top link bar or Quick Launch. You want to make sure that the site and all of its parts have a well-planned navigation model that your users can follow.
Manage business processes
Every business process in an organization consists of a set of activities that are tied together based on a common business need. Workflows are designed around this model by providing rules-based workflows consisting of sets of conditions and actions. You organize and run a series of actions that correspond to a work process based on a sequence of conditions and actions.
You can create workflows using SharePoint Designer 2013 that manage the simplest to the most complex business processes in an organization. Workflows do this by automating both business application processes and human collaborative processes. Workflows for business application processes might update one data source when another data source changes; and workflows for human collaborative processes might send a document to an employee's manager for approval.
A SharePoint workflow introduces application logic to your business processes without requiring you to write code. This is made possible by the powerful yet intuitive workflow editor in SharePoint Designer 2013 that allows nested logic, substeps, and more. Alternatively, you can design and share workflows using Microsoft Visio with its flowchart templates that can be exported to SharePoint Designer 2013.
Following are the building blocks of a workflow in SharePoint Designer 2013.
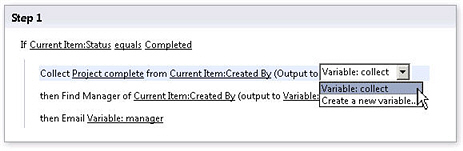
An event is what starts or initiates a workflow. A change to a data source—such as a new item created or an item changed—is one type of event. Another type of event is one activated by a user, a workflow participant. Workflows that start when a data source changes are typically part of an application focused workflow to automate a business process, such as copying files based on the state of data. Workflows that can be started by users are typically part of a human collaborative workflow, such as content approval. Workflows can be set up to recognize both types of events and can even be based on a combination of the two.
Conditions determine when a workflow runs or performs an activity. Since workflows are associated with a data source, the condition specifies the change to the data source that must take place for the workflow to happen. Conditions typically start with the clause “If field equals value.” One condition can be used with multiple actions, and multiple conditions can be used with one action. Rules combine conditions with one or more actions: If all clauses in the condition are true, the associated action takes place.
Actions are the most basic units of work in a workflow. When you design a workflow, you identify the necessary sequence of actions, and then you assemble that sequence of actions in the Workflow Designer. You can set them up so that they occur one after the other (serial actions) or both at the same time (parallel actions). The workflow can contain any number of actions, performed by the workflow itself or the participants in the workflow. SharePoint Designer 2013 includes a rich set of ready-made, reusable actions. Using these actions, your workflows can, for example, send emails, check items in or out of lists, do calculations, and much more.
Of these actions, there is a special set of Task Actions, like the Start Approval Process and Start Feedback Process, that contain a separate workflow editor specifically designed for human task processes in an organization. With these actions, you can create and customize sophisticated workflows that can manage almost any business process.
Workflows are comprised of one or more steps and substeps. Steps allow you to group conditions and actions so that one set of rules can be evaluated and performed before a second set. Each step may contain any number of conditions and actions. Your workflow can be designed as a sequence of actions in a step or a substep. The rules in one step are processed to conclusion before going on to the next step, so you want to group in the same step any rules necessary to effect the specific action or actions that you want. Steps can also be used as a way to organize your workflow, especially if it has numerous actions and very few conditions.
Workflows often contain forms that allow you to collect information from workflow participants at predefined times in the workflow. They also allow participants to interact with the tasks associated with a workflow. In a workflow, you can design initiation forms to gather information from users when they start the workflow, association forms to associate the workflow with a list or content type, forms for custom tasks associated with the Tasks list. When designing forms, you can use the native ASP.NET-based forms (.aspx pages) in SharePoint Designer 2013 or custom forms (.xsn pages) designed with Microsoft InfoPath 2010. InfoPath offers much more in customization and branding for your workflow forms.
A variable is a data storage location or cache inside a workflow. Using variables, you can store different types of data in a workflow and at a later point, reference that data using workflow lookups. There are many types of variables you can use in a workflow. You can use, for example, variables generated by initiation form parameters and local variables, which hold data associated with the current workflow. In a local variable, you can use numerous variable data types, including Boolean, Date/Time, List Item ID, Number, and String. After you create a variable and set it to a value, you can reference that variable in a condition or action later in the workflow.
Design and brand
The final area of customization provided by SharePoint Designer 2013 is design and brand—that is, taking your corporate look and feel and applying it to your SharePoint site. You can incorporate a company logo, color scheme, headers and footers, supporting graphics, custom navigation, and more. As a result, every page on the site can be immediately recognized as being part of a larger corporate site. In SharePoint Designer 2013, you design and brand SharePoint sites using master pages, page layouts, and cascading style sheets.
Designing and branding a site is different from the other pillars of customization, where the focus is on creating custom business solutions. Branding is something you generally perform less often and at the top of a site collection—for example, an Intranet or Internet-facing portal. That custom brand is then inherited by the subsites created below it. The branding effort is also likely to be performed by a web designer rather than a solution creator.
For these reasons, master pages, page layouts, and cascading style sheets are all disabled by default for all users except site collection administrators. This way, only those responsible for the site brand have access to these powerful, yet sensitive files. You can, of course, re-enable them for specific users.
As a site designer, here are the ways you can create a custom brand for your sites using SharePoint Designer 2013.
Master pages
Master pages are a feature of ASP.NET, and they’re included with SharePoint as a way to design the layout of your site in one place and reuse it as a template for other pages across the enterprise. Every time you view a page on a SharePoint site, you’re viewing two pages merged together – a master page and a content page. The master page defines the common layout and navigation (which typically make up the left, top, and bottom portions of the page). The content page supplies page-specific content. SharePoint Designer 2013 provides a rich set of page editing tools that you can use to customize your master pages and share them with others.
Page layouts
If you’re working with a publishing site, you also design the appearance and layout of the site using page layouts. Page layouts serve as templates for the publishing pages created by users in your organization. In addition to the master page, they provide granular control and structure for a publishing page, such as designating where a title, body text, and graphics can be placed on a page. Publishing pages use the publishing infrastructure in SharePoint, and they help you streamline browser-based content authoring and publishing without all the overhead typically associated with the process.
Cascading Style Sheets
Like most web sites and web applications, SharePoint uses cascading style sheets (CSS) to apply colors, graphics, and positioning to the various objects that make up the pages on a site. In many cases, there are multiple style sheets applied to a page. To customize these styles, you can modify them directly in the master page, page layout, or site page, or modify the styles directly in the CSS file attached to the page – both of which you can do using the powerful CSS editing tools in SharePoint Designer 2013. You can also customize your SharePoint themes using CSS files. By customizing CSS files, you alter the look, or “skin,” of a SharePoint site so that it has your corporate look.
Deploy custom SharePoint solutions
Everything up to this point has focused on how you can use SharePoint Designer 2013 to create real business solutions. You’ve seen that you can connect to and integrate with data both inside and outside of SharePoint, create powerful user interfaces to this data, manage business processes with workflows, and brand the site to match your corporate look and feel.
But now you need to do something with your solutions – such as deploying it to another server or across the enterprise, opening it in Visual Studio for additional customization, or saving it offline to take it on the road with you. You need a way to turn your solution into a package, and this is where the Save as Template option comes in.
The ability to save a solution as a template is a powerful feature of SharePoint. The template is saved as a web Solution Package (a .wsp file) that contains the entire contents of your site, including data sources and structure, views and forms, workflows, and web Parts.
Templates are granular too. You might be working on one specific part of the site, like a list, a view, or a workflow. You can save these as individual components as templates too, which presents a whole new way to collaborate on solution development.
Completing the business solution cycle in SharePoint
As you spend more time in SharePoint Designer 2013, you quickly realize that you can do much more than basic site customization. You can create real business solutions that contain data connections, data-rich user interfaces, custom workflows, and complete site branding. You can build it all on SharePoint, and you can follow an application development lifecycle that ends with a deployable solution.


