
If your organization spans a diverse population, you may want to make content in your intranet sites available in more than one language. User interface elements like site navigation, site title, and site description can be shown in the user's preferred language. Additionally, you can provide pages and news posts on SharePoint sites that you translate and that are shown in the user's preferred language.
This page details Microsoft's recommended approach for presenting site and page content in multiple languages. Adding multiple language content in the same SharePoint page is not supported and is not recommended as a solution.
Check out this video, and see the steps below to learn how to use multilingual features.

First, make sure the SharePoint site you use is created with the site default language you want to use. The default language of the site can't be changed later. To learn more about creating SharePoint sites, see Create a site in SharePoint.
After making sure your site was created with the default language you want to use, enable your site to use multilingual features and choose the languages you want to make available. To learn which languages are available, you can choose from, see Languages supported by SharePoint.
To create pages on sites in different languages, you can use the translation feature to make copies of pages created in your default language. The copies can then be manually translated. Published translation pages are automatically shown in the appropriate language site, including in the News and Highlighted content web parts for each language.
Notes:
-
Pages are not translated automatically. Each page created in your default language can have a corresponding page in a chosen target language that you, or someone you assign, manually translates. After you translate such a page and publish it, it will automatically be displayed to users who prefer that language.
-
Changes to the original, source page or to other translation pages are not automatically synced with all translation pages. Each translation page must be updated manually.
-
The language displayed to a user will depend on their personal language and region settings.
-
We recommend using the steps in this article for multilingual sites. However, if you are using SharePoint Server versions earlier than 2019, see Using the variations feature for multilingual sites.
-
The multilingual features described in this article are not available on subsites.
-
Multilingual features will only be available on sites that have publishing infrastructure settings disabled.
In this article
Enable multilingual features and choose languages
Create pages for the languages you want
View a translation page on its language site
Updating the default language page
Translation pages in News and Highlighted content web parts
Enable the multilingual feature and choose languages
-
Go to the SharePoint site where you want to enable multilingual features.
Note: Private preview customers can apply page translations to team sites using the instructions in this article. Page translations for team sites will become generally available to all customers in August 2022.
-
Select Settings from the top right, and then select Site information.
-
At the bottom of the site information pane, select View all site settings.
-
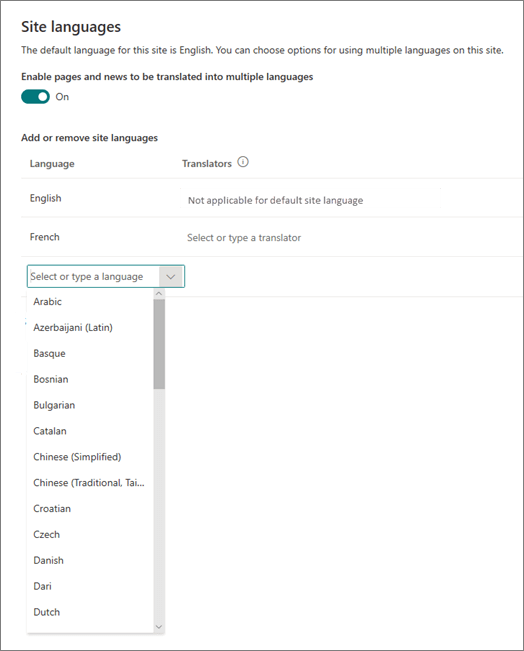
Under Site Administration, select Language settings.
-
Under Enable pages and news to be translated into multiple languages, slide the toggle to On.
-
Under Add or remove site languages, start typing a language name in Select or type a language, or choose a language from the dropdown. You can repeat this step to add multiple languages.
-
You can add or remove languages from your site at any time by going back to this page.
-
If you're going to translate pages, optionally assign one or more translators for each language (except the site default language). In the Translator column, start typing the name of a person you want to be a translator, and then select the name from the list.
Note: Anyone in your organization's Active Directory can be assigned as a translator. People assigned as translators will not automatically be given appropriate permissions. When someone without edit permissions to a site tries to access the site, they will be directed to a web page where they can request access.
-
Select Save.
Once you've added languages, you'll see a dropdown on your site that allows you to go to the different language sites you select.
Note: The default language of a site is set to the language chosen when the site is created. However, when English is among the supported languages, English is treated as the preferred language if the user's preferred language is not supported by the site. This is a known issue.
Create pages for the languages you want
Once you've enabled your site for multilingual features and you've chosen the languages you want to make available, you can create the translation pages you want. To do this:
-
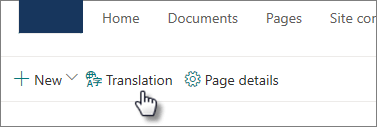
Go to the default language page you want to make available in another language.
-
On the top bar, select Translation.
-
-
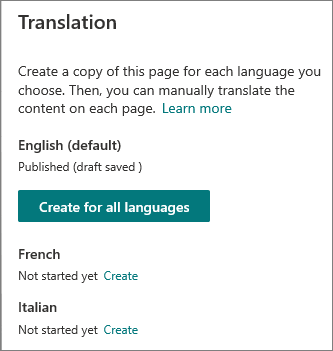
If you want to create a page for translation in each of all languages available for your site, select Create for all languages. Otherwise, select Create only for the languages you want.
Important: If you create translation pages while your default language page has unpublished changes, you must republish the default language page to ensure that:
-
Translation pages are shown in the corresponding language site.
-
Translation pages display correctly in the News web part and the Highlighted content web parts.
-
The language dropdown at the top of the site includes all of the languages you enabled.
-
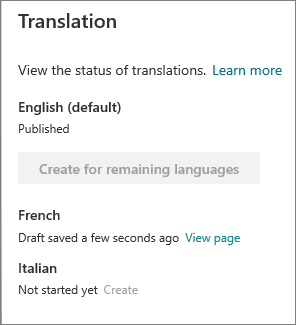
Once the page(s) are created, the status of the page (draft saved, published, and so on) are shown in the translation pane next to each language. Also, the translator(s) you assigned will be notified in email that a translation is requested.
View a translation page on its site
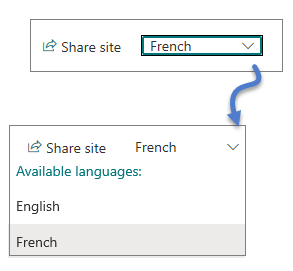
To make sure your translation pages are displayed in the correct language, go to the default site language page, and select the dropdown at the top of the page. Choose the language for the translation page you want to view.
Note: When you change the language in the dropdown, it applies to all pages on that site for the duration of the browser session. It does not affect your user language preference (which determines the language displayed for items like site name, title, and navigation).
Check status of pages
The status of each page (draft saved, published, and so on) are shown in the translation pane next to each language. To see the status:
-
Go to the default language page.
-
Select Translation at the top of the page.
In the Translation pane on the right, the status of each language page is shown, as well as a link to view the page.
What does a translator do?
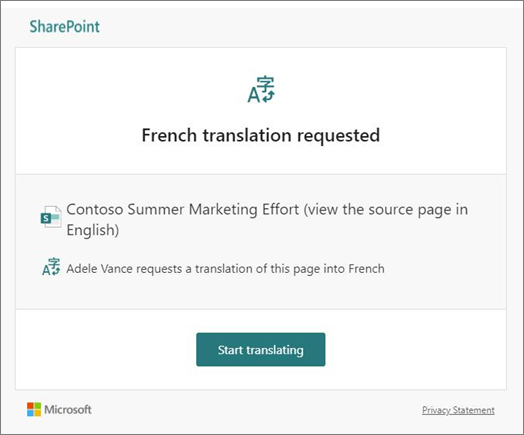
Translators manually translate the copies of the default language page into the language(s) specified. When the copies of the page(s) are created, translators are notified in email that a translation is requested. The email includes a link to the default language page and the newly created translation page. See the section Email notifications below for more information. The translator will:
-
Select the Start translating button in the email.
-
Select Edit on the top right of the page, and translate the content.
-
When done, select Save as draft (if you're not ready to make it visible to readers)or, if the page is ready to be visible to everyone who is using that language on the site, select Publish or Post news.
If approvals or scheduling is on, the buttons may say Submit for approval or Publish later/Post later. -
An email notification will be sent to the person who requested the translation.
Email notifications
-
When a translation page is created, an email is sent to the assigned translator(s) to request a translation. The email includes a Start translating button.
-
When a translation page is published by a translator, an email is sent to the person who requested the translation.
-
When an update is made to the default language page and saved as a draft, an email is sent to the translator to notify them that an update to the translation page may be required.
Email notifications are batched in 30-minute increments as needed. For example, when the first email related to a page is sent, and an update is made to the default language page, the next notification email or any others that need to be sent, will be batched and sent after 30 minutes.
Page approvals
When page approvals are on, the default language page and the translation pages must be approved and published before the translation pages are available to everyone who has access to the page.
Updating the default language page
When the default language page is updated, the page must be republished. Then, the translator(s) for the translation pages are notified in email that an update has been made so updates can be made to the individual translation pages.
Translation pages in News and Highlighted content web parts
Site home pages, posts, and pages are displayed according to the languages of the pages. This means that:
-
If your site home page is not translated into the user's preferred language, all content on the page (including news posts and highlighted content) will display in the default site language.
-
If an individual news post or page is not translated into the user's preferred language, that post or page will use the default site language when it appears in the news web part or highlighted content web part.
Note: Translation pages and news posts must be approved and published before they will appear in the News or Highlighted content web parts.
Delete a translation page
When you delete a translation page, you have to perform a few additional steps to break the association between the default language page and the deleted translation page, which includes opening the default language page for editing, opening the Translation panel, and then republishing it.
-
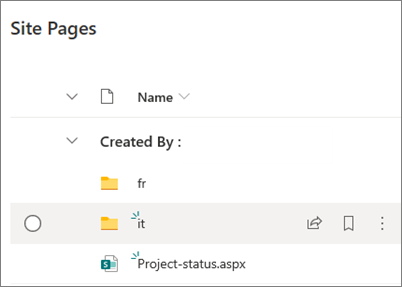
Go to the Pages library for the site.
-
Find the page you want to delete in the language folder adjacent to the default language page. The folder can be identified by it's 2- or 4-letter language code. For example, the French folder will be identified as fr.
-
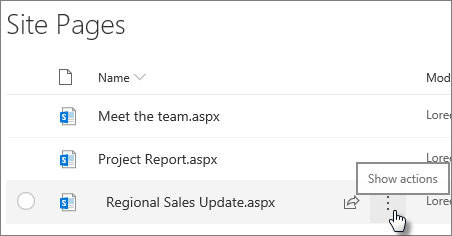
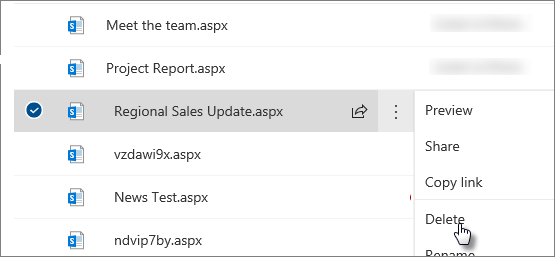
Select the page you want within the folder, and then click the ellipses (...) to the right of the selected page.
-
Click Delete.
-
After you've deleted the page, go to the default language page and select Edit at the top right. If you are not in edit mode, the rest of the steps will not work.
-
Select Translation at the top of the page.
-
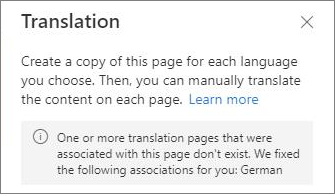
In the Translation panel, you should see a message indicating that an association with the page has been fixed.
-
Republish the default language page.
Find translation pages
You can use the language dropdown at the top of the page, the translation panel, or find the page in the Pages library.
To find it in the Pages library, do this:
-
Go to the Pages library for the site.
-
Find the page you want to delete in the language folder adjacent to the default language page. The folder can be identified by it's 2- or 4-letter language code. For example, the French folder will be identified as fr.
Set up a multilingual site name, navigation and footer
To show the site name, navigation, and footer of your site in the different languages you've made available, each must be translated manually. You can add or update translations when you edit any of these elements.
For example, let's say you've created a site with an English default language, and you've enabled the site for French and Italian languages. When you create a site, you set up the site name and description in the default language (in this case, English). You can also update the site name and description after site creation. Then you create the navigation nodes and footer content in English, during which time you can also add your translations.
Notes:
-
Users who translate the site content should be in the Owners or Members group for the site or have equivalent site permissions.
-
If a translation does not exist for a specific language, then a user with that preferred language will see the default language. For example, if the default language is English, and a French translation has not been added for a navigation display name, a user with a preferred language of French will see the English display name.
-
Hub navigation is also supported. It may take up to 2 hours to reflect changes for all hub sites.
-
The site name and description are not translatable in sites connected to a Microsoft 365 Group.
-
When the Enable pages and news to be translated into multiple languages option is on, the Overwrite site translations option does not affect the translated site names, descriptions, or navigation names. It does continue to affect other items such as lists and more. See Overwrite site translationsfor more information.
Add a translated site name and description
-
On your site home page, select Settings at the top of the page.
-
Select Site Information.
-
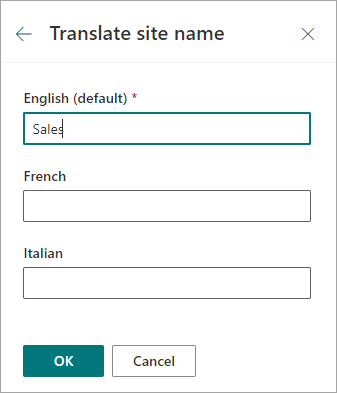
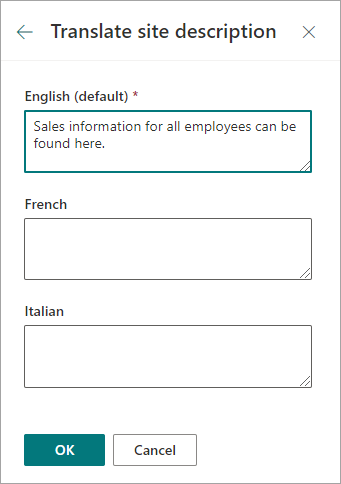
Under Site name, select Translate site name or, under Site description, select Translate site description.
-
Add or update your translated site names.
Repeat the previous steps to add or update translated site descriptions.
Add or update translated navigation display names
-
Select Edit in the top navigation bar.
-
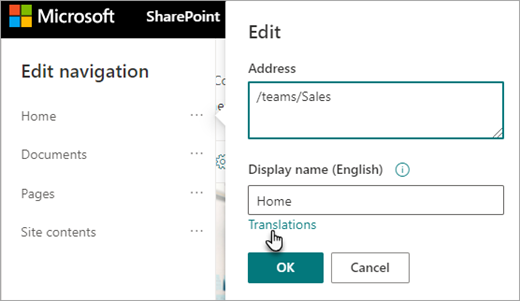
In the Edit navigation panel, select the ellipses (...) next to the name you want.
-
Select Edit.
-
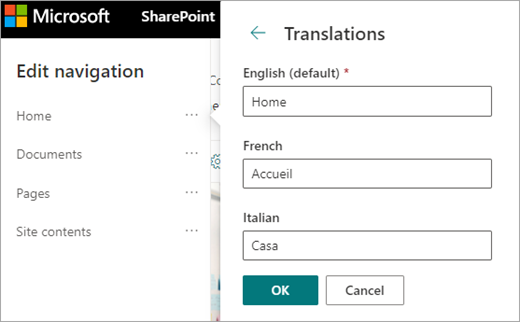
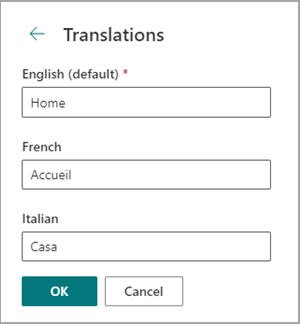
Under Display name, select Translations.
-
Add or update your translated display names.
Add or update translated footer navigation display names
-
Select Edit in the site footer.

-
In the Edit footer panel, select the ellipses (...) next to the footer display name you want.
-
Select Edit.
-
Under Display name, select Translations.
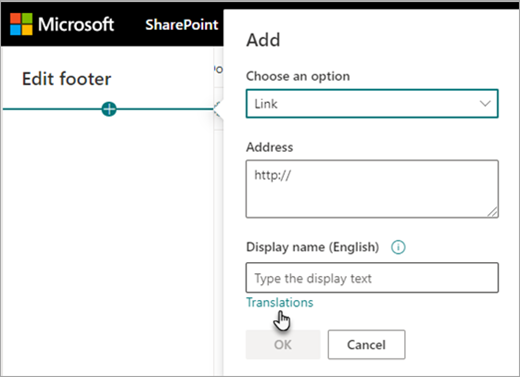
-
Add or update your translated display names.
Tip: You can also add or update translate the footer display names by selecting Settings at the top, then select Change the look > Footer.
Learn more about editing content when the viewer's preferred language differs from the default language
A site's default language is determined when the site is created. Users are able to select their preferred language (sometimes called a personal language) in their Microsoft 365 settings. Sometimes, the site's default language differs from the user's preferred language.
When the default and preferred language settings differ, SharePoint will allow users to edit site content in their preferred language without enabling multilingual features. Additional language information is provided when editors make changes to navigational labels, site descriptions, footers, and the site's name to prevent users from editing site content into the wrong language.
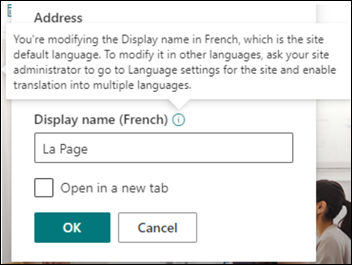
In the image above, the site's default language is French, and the user's preferred language is English. If the user edits this navigational node, it should be in the French language to prevent displaying a label in English when the site's default language is French. If the user wants to edit this navigational node into English, they should enable the multilingual feature.
In previous versions of SharePoint, when the multilingual feature was not turned on, and users with different preferred languages edited site content like navigation node labels, they ended up with translations that didn’t match the site’s default language or other viewers’ preferred language. Therefore, for some viewers, some navigational labels were in a different language than the rest of the site’s content. Now, the additional information that’s provided when editing is designed to confirm that the site’s default language and the users’ preferred language are different. In this scenario, the multilingual feature should be turned on to prevent incorrect translations.
How to solve common issues
How to correct the title of a site displaying in the non-default language:
-
Navigate to the site and select Settings > Site information > View all site settings > Language settings.
-
Enable translation into multiple languages (you can turn this off again later.)
-
Select the language that needs to be updated and then select Save.
-
Navigate back to the site's homepage for the site and then select Settings > Site information > Translate site name.
-
In the site information panel, remove or edit content that has an incorrect translation. If it is empty, users of that language will see the default-language text instead. You can also enter a translated text.
-
Select OK > Save.
How to correct other common issues:
-
Translation pages are not shown in the corresponding language site
-
Translation pages do not display correctly in the News web part and the Highlighted content web parts
-
The language dropdown at the top of the site does not include all of the languages you enabled
If you encounter one of these issues, it may be because of a break in a page association. Try the following:
-
Go to the default language page.
-
You must be in edit mode, so select Edit at the top right of the page.
-
Select Translation at the top of the page.
-
In the Translation panel, check for a message indicating that an association with the page has been fixed:
-
Republish the default language page.


