
Important: The UML Collaboration diagram is not available in Visio 2013 and newer versions. For information on UML diagrams in Visio 2013 and newer versions, see UML diagrams in Visio.


-
In : Under Template Categories, click Software and Database > UML Model Diagram > Create.
In Visio 2007: On the File menu, point to New, point to Software, and then click UML Model Diagram.
-
In the tree view, right-click the package in which you want to include the collaboration diagram, point to New, and then click Collaboration Diagram.
A blank page appears, and the UML Collaboration stencil becomes the top-most stencil. The workspace displays 'Collaboration' as a watermark. An icon representing the diagram is added to the tree view in the Model Explorer.
Note: If the tree view is not visible, on the UML menu, point to View, and then click Model Explorer.
-
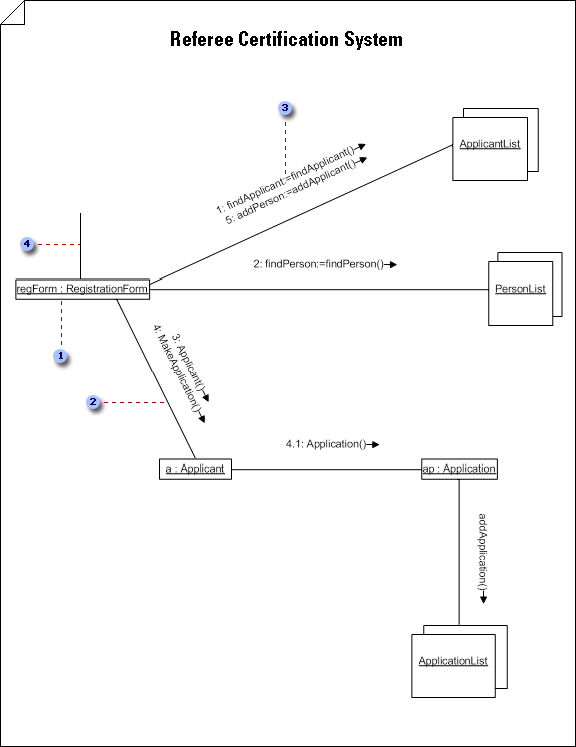
For each object role you want to represent in the collaboration, drag a Classifier Role shape onto the drawing page.
Designate an object as new, destroyed, or transient in a collaboration diagram
-
In a collaboration diagram, right-click the Classifier Role shape for the object you want to designate as new, destroyed, or transient, and then click Shape Display Options.
-
Under Classifier role state, click the condition you want.
Note: To apply this change only to the selected shape, in the Shape Display Options dialog box, clear the option Apply to the same selected UML shapes in the current drawing window page. If you want all subsequent classifier role shapes you drop on the diagram to have the same condition, select the Apply to subsequently dropped UML shapes of the same type in the current drawing window page check box.
The condition appears in brackets after the object name (for example, Object1{transient}).
Designate an object as active in a collaboration diagram
In a collaboration diagram, a Classifier Role shape designated as active will include {active} after the object name. A classifier role is active when the class it is based on is active.
To indicate that a class is active, double-click the shape or tree view icon that represents the class. In its UML Class Properties dialog box, click Class, check IsActive, and then click OK. The classifier role becomes active as a result of the class being active.
-
-
For each set of objects you want to represent, drag a Multi-Object shape onto the drawing page. Multi-Object shape
-
Double-click each Classifier Role or Multi-Object shape to open the UML Classifier Role Properties dialog box where you can add a name and other property values.
-
Indicate links between the objects by connecting them using Association Role shapes. Learn more about Association Role shapes.
Create an association role path in a collaboration diagram
-
In a collaboration diagram, drag an Association Role shape near the two Classifier Role or Multi-Object shapes you want to create a path between.
-
Glue the endpoints of the Association Role shape to connection points

Tip: To indicate an association role path from a classifier role to itself, glue the two endpoints of a U-shaped Association Role shape to two connection points on the same classifier role.
-
-
Double-click each Association Role shape to open the UML Association Role Properties dialog box, where you can add a name, a message flow, a message label, multiplicity, and other property values.
Add a message to an association role in a collaboration diagram
-
In a collaboration diagram, double-click the Association Role shape to which you want to add a message.
-
Type a name for the association role, and then click Messages.
-
Click New. Type a name and sequence expression. Choose the stereotype, direction, and flow kind you want.
-
For a flat message or procedure call, click Properties. Select the operation you want the message to generate. If the operation doesn't exist, click New to create it.
For an asynchronous message, choose the signal you want the message to generate. If no reception for the signal exists on the classifier that the object lifeline receiving the message is based on, click New to create the reception.
-
-
Save the diagram.


