
When you want to select specific data from one or more sources, you can use a select query. A select query helps you retrieve only the data that you want, and also helps you combine data from several data sources. You can use tables and other select queries as data sources for a select query. This topic provides an overview of select queries, and gives steps for creating a select query, by using the Query Wizard or in Design view.
If you want to use the Northwind sample database to learn more about how queries work, see the article Introduction to queries.
In this article
Overview
When you want to use data, you rarely want to use all of the data from one table. For example, when you want to use data from a Contacts table, you usually want to look at one specific record, or maybe just the telephone number. Sometimes you want to combine data from more than one table, such as combining Customer information with Order information. To select the data that you want to use, you use a select query.
A select query is a database object that shows information in Datasheet view. A query does not store data, it displays data that is stored in tables. A query can show data from one or more tables, from other queries, or from a combination of the two.
Benefits of using a query
A query lets you:
-
View data only from the fields you are interested in viewing. When you open a table, you see all the fields. A query is a handy way to save a selection of fields.
Note: A query only points to data, it does not store data. When you save a query, you are not saving a copy of the data.
-
Combine data from several data sources. A table usually only displays data that it stores. A query lets you pick and choose fields from various sources, and specify how the information should be combined.
-
Use expressions as fields. For example, you could use the Date function as a field, or you could use the Format function with a field to control the way the data from the field is formatted in the query results.
-
View records that meet criteria that you specify. When you open a table, you see all the records. A query is a handy way to save a selection of records.
Basic steps to create a select query
You can create a select query by using the Query Wizard or by working in Design view. Some design elements are not available when you use the wizard, but you can add these elements later by using Design view. Although the two methods are somewhat different from each other, the basic steps are essentially the same:
-
Choose the tables or queries that you want to use as sources of data.
-
Specify the fields that you want to include from the data sources.
-
Optionally, specify criteria to limit the records that the query returns.
After you have created a select query, you run it to see the results. To run a select query, you open it in Datasheet view. If you save the query, you can reuse it whenever you need, for example, as a data source for a form, report, or another query.
Use the Query Wizard to create a select query
You can use the Query Wizard to automatically create a select query. When you use the wizard, you have less control over the details of the query design, but the query is usually created faster than if you did not use the wizard. Moreover, the wizard can catch some simple design mistakes and prompt you to perform a different action.
Before you begin
If you use fields from data sources that are not related to each other, the Query Wizard asks you if you want to create relationships. The wizard opens the Relationships window for you, but you must restart the wizard if you edit any relationships. Therefore, before you run the wizard, consider creating any relationships that your query needs.
For more information about creating table relationships, see the article Guide to table relationships.
Use the Query Wizard
-
On the Create tab, in the Queries group, click Query Wizard.

-
In the New Query dialog box, click Simple Query Wizard, and then click OK.
-
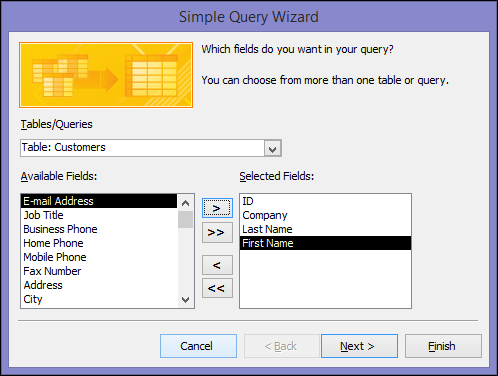
Next, you add fields. You can add up to 255 fields from as many as 32 tables or queries.
For each field, perform these two steps:
-
Under Tables/Queries, click the table or query that contains the field.
-
Under Available Fields, double-click the field to add it to the Selected Fields list. If you want to add all fields to your query, click the button with the double right arrows (>>).
-
When you have added all the fields that you want, click Next.
-
-
If you did not add any number fields (fields that contain numeric data), skip ahead to step 9. If you added any number fields, the wizard asks whether you want the query to return details or summary data.
Do one of the following:
-
If you want to see individual records, click Detail, and then click Next. Skip ahead to step 9.
-
If you want to see summarized numeric data, such as averages, click Summary, and then click Summary Options.

-
-
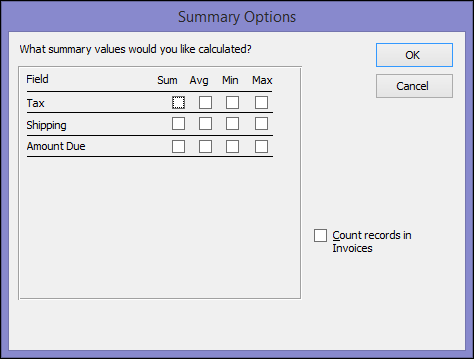
In the Summary Options dialog box, specify which fields you want to summarize, and how you want to summarize the data. Only number fields are listed.
For each number field, choose one of the following functions:
-
Sum The query returns the sum of all the values of the field.
-
Avg The query returns the average of the values of the field.
-
Min The query returns the smallest value of the field.
-
Max The query returns the largest value of the field.
-
-
If you want the query results to include a count of the records in a data source, select the appropriate Count records in data source name check box.
-
Click OK to close the Summary Options dialog box.
-
If you did not add a date/time field to the query, skip ahead to step 9. If you added a date-time field to the query, the Query Wizard asks you how you would like to group the date values. For example, suppose you added a number field ("Price") and a date/time field ("Transaction_Time") to your query, and then specified in the Summary Options dialog box that you want to see the average value of the number field "Price". Because you included a date/time field, you could calculate summary values for each unique date/time value, for each day, for each month, for each quarter, or for each year.
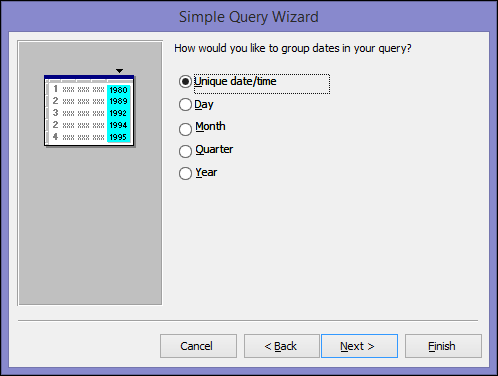
Select the time period that you want to use to group the date/time values, and then click Next.
Note: In Design view, you can use an expression to group by any time period you want, but the wizard only offers these choices.
-
On the last page of the wizard, give the query a title, specify whether you want to open or modify the query, and then click Finish.
If you choose to open the query, the query displays the selected data in Datasheet view. If you choose to modify the query, the query opens in Design view.
Create a query by working in Design view
You can use Design view to manually create a select query. When you use Design view, you have more control over the details of the query design, but it is easier to make design mistakes, and it can take longer than using the wizard.
Create a query
Step 1: Add data sources
When you use Design view, to add data sources, you add the data sources and fields in separate steps. However, you can always add more data sources later if you want.
-
On the Create tab, in the Queries group, click Query Design.
-
Double-click each data source that you want to use or select each data source and then click Add.

Automatic joins
When you add the data sources, if the sources already have relationships defined between them, those relationships are automatically added to the query as joins. Joins specify how data from related sources should be combined. Access also automatically creates a join between two tables if they have fields have compatible data types and one field is a primary key.
You might want to adjust the joins that Access creates. Access determines what type of join to create based on the relationship the join represents. If Access creates a join but there is no defined relationship, Access creates an inner join.
If Access automatically creates the correct joins when you add the data sources, you can skip ahead to Step 3: Add output fields.
Use the same data source several times
In some cases, you want to join two copies of the same table or query, called a self-join, that combines records from the same table when there are matching values in the joined fields. For example, say you have an Employees table in which the ReportsTo field for each employee's record displays his or her manager's ID instead of name. You could use a self-join to display the manager's name in each employee's record instead.
When you add a data source a second time, Access appends _1 to the name of the second instance. For example, if you added the Employees table twice, the second instance would be named Employees_1.
Step 2: Join related data sources
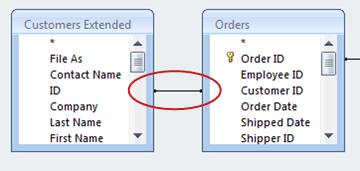
If the data sources that you add to a query already have relationships, Access automatically creates an inner join for each relationship. If referential integrity is enforced, Access also displays a "1" above the join line to show which table is on the "one" side of a one-to-many relationship and an infinity symbol (∞) to show which table is on the "many" side.
If you add queries to your query, and have not created relationships between those queries, Access does not automatically create joins between those queries, or between queries and tables that are not related. If Access does not create joins when you add data sources, you should usually add them yourself. Data sources that are not joined to any other data source can cause problems with the query results.
You might also want to change the type of a join from an inner join to an outer join, so that your query includes more records.
Add a join
-
To add a join, drag a field from one data source to a corresponding field on another data source.
Access displays a line between the two fields to show that a join has been created.
Change a join
-
Double-click the join you want to change.
The Join Properties dialog box appears.
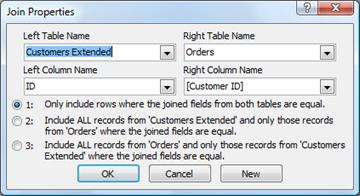
-
In the Join Properties dialog box, review the three options.
-
Click the option that you want to use, and then click OK.
After the joins are ready, you add output fields — fields that have data that you want in the query results.
Step 3: Add output fields
You can easily add a field from any of the data sources that you added in step 1.
-
To add a field, drag the field from a data source in the upper pane of the query design window down to the Field row of the design grid, in the bottom pane of the query design window.
When you add a field this way, Access automatically fills in the Table row of the design grid to reflect the data source of the field.
Tip: If you want to quickly add all fields down to the Field row of the query design grid, double-click the table or query name from the upper pane to highlight all the fields in that source and then drag them all down to the design grid at the same time.
Use an expression as an output field
If you want to perform calculations or use a function to produce query output, you can use an expression as an output field. An expression can use data from any of the query data sources, as well as functions, such as Format or InStr, and can also contains constants and arithmetic operators.
-
In an empty column of the query design grid, right-click the Field row, and then click Zoom on the shortcut menu.
-
In the Zoom box, type or paste your expression. Preface your expression with the name you would like to use for the expression output, followed by a colon. For example, if you wanted the expression to be labeled "Last updated", you would start your expression with Last updated:.
Note: You can do a wide variety of things by using expressions. A thorough explanation of expressions is beyond the scope of this article. For more information about creating an expression, see the article Build an expression.
Step 4: Specify criteria
This step is optional.
You use criteria to limit the records that your query returns, on the basis of whether field values meet the criteria that you specify.
Specify criteria for an output field
-
In the query design grid, in the Criteria row of the field that has values that you want to limit, type an expression that field values must satisfy to be included in your results. For example, if you wanted to limit a query so that only records where the value of the field City is Las Vegas, type Las Vegas in the Criteria row under that field.
For many examples of query criteria for various data types, see the article Examples of query criteria.
-
Specify any alternate criteria in the Or row, below the Criteria row.
If you specify alternate criteria, a field value can meet any of the listed criteria and be included in the query result.
Multiple field criteria
You can use criteria with multiple fields. When you do, all the criteria in a given Criteria or Or row must be true for the record to be included.
Specify criteria by using a field that you don't want to output
You can add a field to your query design and not include the field's data in the query output. You do this if you want to use the field's values to limit the query results, but don't want to see the field values.
-
Add the field to the design grid.
-
Clear the check box in the Show row for the field.
-
Specify criteria as you would for an output field.
Step 5: Summarize data
This step is optional.
You might want to summarize data, especially if your data is numeric. For example, you might want to see the average price, or total sales.
To summarize data in a query, you use the Total row. By default, the Total row is not displayed in Design view.
-
With the query open in Design view, on the Query Design tab, in the Show/Hide group, click Totals.
Access displays the Total row in the query design grid.
-
For each field that you want to summarize, choose the function to use from the list in the Total row. The functions that are available depend on the data type of the field.
To learn more about the Total row functionality in queries, see the article Display column totals in a datasheet using a Totals row.
Step 6: View the results
To see the query results, on the Query Design tab, click Run. Access displays the results of your query in Datasheet view.
To make further changes to the query, click Home > View > Design View to switch back to Design view.
Change your fields, expressions, or criteria and rerun the query until it returns the data that you want.


